Hello everyone, welcome to my blog and to Spellbinders™ Bunny Blog Hop! I’m so thrilled that you’ve joined me today.

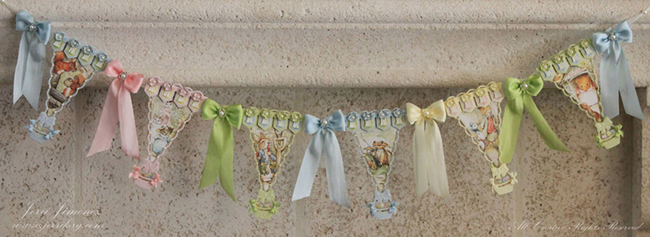
I’ve designed an adorable Beatrix Potter Easter banner for my fireplace mantle using Spellbinders™ Easter Fun, Banner Basics Three, Pennants, Lacey Pennants and Fancy Tags Two dies. This picture doesn’t show much of my limestone fireplace, but I wanted the focus to be on the Easter banner. Due to the height and width of the design, I’m afraid it looks like a postage stamp here, I apologize. When I tried to make the picture bigger, it ran off the right side of my blog and part of the banner disappeared. I decided to take individual pictures of each pennant so that you can see the detail on each.

Large pearls were strung on cream colored sheer ribbon, smaller pearls were placed throughout the designs on the pennants, Easter baskets, bows and blossoms. Pastel glitters were applied to the blossoms, Easter baskets and eggs. Large double looped pastels bows were placed alternately with the pennants. Small single loop bows adorn the Easter baskets.

Each pennant represents a Beatrix Potter tale. This pennant represents The Tale of Squirrel Nutkin. I alternated pastel colors on the banners, i.e., green/blue, pink/yellow. Dots of glitter were placed on the bottom of the tassels. I placed the tassels underneath the blossoms, traditionally they are placed at the bottom of the banner. Coordinating colors were sponged on the banners, using the stencil aspect of the dies. The blossoms on the banner were made using the flower die from the Easter Fun dies. The eggs were made using the Fancy Tags Two dies. I’ve taken photos of how I made the baskets and will post directions here on my blog next week.

This pennant represents The Tale of Tom Kitten, an adorable story of naughty kittens. The banner is very sturdy. To reinforce the pennants and baskets I cut pennants and baskets from cereal boxes and covered them with the cardstock. I’ll post pictures next week giving instructions on how I made the pennants.

I can’t think of anything more adorable and appropriate for Easter than The Tale of Peter Rabbit! This story was read to my boys multiple times during their childhood years.
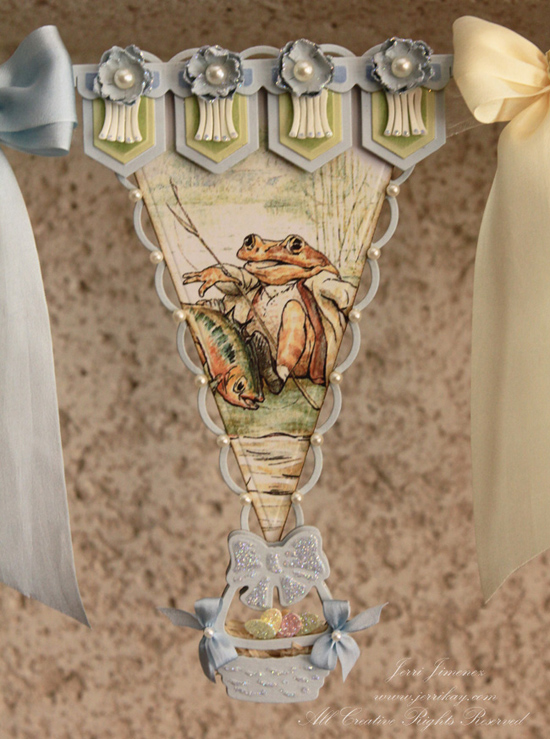
This pennant represents The Tale of Jeremy Fisher, a “toadily” adorable fishing tale!

This pennant represents the all too adorable Tale of Jemima Puddle-Duck.

The last pennant represents The Tale of Ginger and Pickles, an enterprising tale to say the least . . . LOL!

I began and ended the banner with blue silk bows, sheer ribbon and pearls.

The Easter baskets are so adorable! I placed them at the bottom of each pennant. It was so much fun filling them with these tiny eggs I made from negative cut outs from the Fancy Tags Two dies!

The baskets are sandwiched together with grass in the middle, the eggs were placed on top of the grass.

I used one inch sheer ribbon to string the banner together. The ribbon was adhered to the backs of the pennants with double sided sticky tape. I then covered the ribbon with banners from the Banner Basics Three. Pastel silk bows were placed between the pennants with blossom adornments on both sides. I used Glue Dots to adhere the bows to the sheer ribbon.
Supplies:
Paper: Light Pink, Light Blue, Light Green, Light Yellow, White Card Stock
Ink: Vintage Photo Distress Ink
Ribbon: 1.5 Silk; .25 Silk (Colors: Yellow, Pink, Blue, Green pastels); 1 inch cream sheer ribbon, Bow Easy (Stamp Simply Ribbon Store)
Accessories: Pearls (Darice); Sewing Machine, Zip Dry, Perga Glue, Glue Dots, Embossing Pad, Embossing Tool Small Ball, Embossing Tool Large Ball (A Touch of Grace-Paper Boutique), Pastel Glitter, Copy Machine, Peter Rabbit’s Giant Story Book, Pastel Brads, Sponges, Cereal Boxes (for chipboard), Grand Calibur (Spellbinders); Easter Grass (Pottery Barn)
Thank you so much for visiting today! Good luck with winning these fabulous Spellbinders™ dies!
Paper Hugs,
From Dave at Memory Box . . . note the 'very fine' cutting detail of his design team member! BTW, the Memory Box order arrived yesterday and awaits you at the store!


I especially like how she re-interpreted the entire image of the Hope collage. It has been completely transformed from a background stamp, into several different elements.


Isn't it interesting how the petals curl and overlap on the flowers? This 3-D effect adds a lot to the card, and she added some shading to make it really feel like the flowers have depth. The simple white background is perfect. And the tiny Diamond Jewel stickers in the center? Quite beautiful!
That's it for now . . . these rainy days and nights make for the perfect excuse to stay bundled up inside and CREATE! Or, better yet, spend some time at the store to browse, visit and become inspired to CREATE even more!
From Dave at Memory Box . . . note the 'very fine' cutting detail of his design team member! BTW, the Memory Box order arrived yesterday and awaits you at the store!
Posted: 24 Mar 2011 05:36 PM PDT
I thought that I would introduce you to another member of our talented design team this week who has a detailed style that is similar to Deborah's - but she puts her own twist on each card and we can always spot it. This week's special Design Team member is Suzanne Czosek, who crafts cards and other paper projects professionally! Here's a little background on Suzanne:
Suzanne Czosek lives in Northern Illinois with her husband, nine year old daughter, fourteen year old daugher, sixteen year old son and two dogs (Harry and Emma). She works full time as a project manager and her passion is her stamping and crafting projects. She is part of the Crafts N Things Design team and publishes a technique article in every issue. She has a few cards planned in the next issue using the new Memory Box stamps. She loves contributing to the Memory Box Outside the Box Blog. You can find her teaching classes at Stamp Scrap and More in Mundelien, Illinois. Her style in cards ranges from beautiful and elegant to vintage and shabby chic.
She loves working with Memory Box - the stamps, papers, jewels and everything is wonderful and she is so happy to be designing for them.
Let's take a closer look at her project today!
Receiving a card from Sue is more like receiving a gift - the sculpted components and layers are substantial, with extra attention to texture.
Isn't it beautiful the way she layers ribbon, paper roses and canvas paper butterflies?
The details are superb - I noticed as I photographed the card that there was a different story from every angle. I love the beaded pin that is tucked underneath the bouquet and expertly cut rose stems. Where are the rose stems from? Well...
...the Hope Collage G1732 is where she carefully cut out four stems, and placed them so that it looked like they were bundled in with the paper roses.
I especially like how she re-interpreted the entire image of the Hope collage. It has been completely transformed from a background stamp, into several different elements.
Posted: 28 Mar 2011 04:15 PM PDT
Suzanne continues to dazzle me today - I think that this card might actually qualify as couture in the stamping world.
She did some really interesting piecing on the Orchid Branch Print G1718 - stamping on vellum and then cutting out petals to layer and build the flowers.
Isn't it interesting how the petals curl and overlap on the flowers? This 3-D effect adds a lot to the card, and she added some shading to make it really feel like the flowers have depth. The simple white background is perfect. And the tiny Diamond Jewel stickers in the center? Quite beautiful!
That's it for now . . . these rainy days and nights make for the perfect excuse to stay bundled up inside and CREATE! Or, better yet, spend some time at the store to browse, visit and become inspired to CREATE even more!
I LOVE THE VELLUM LOOK LAYERED IN THE FLOWERS
ReplyDeleteCARD.Great job