 |
| by Marj Marion The black squares were taken from the overlay frame on this class card:  |
 |
| by Marj Marion Cheery Lynn Dies: CG 250 & 251; Black Flowers (DL 218); Rose (B155) |
 |
| by Marj Marion Using a favorite commercial card from England as the designer paper. Cheery Lynn Lattice Frame Die (FRM 132) that she WEAVED! with plain blue paper using the Cheery Lynn Big Weaver Die (W104) |
 |
| by Marj Marion Cheery Lynn Manon's Wedding Garland Die plus flowers; Stamp: Memory Box Bird Collage E1102 |
 |
| by Marj Marion Partial die-cuts and Candi's Impression Obsession Stamps: Time Began (B3668); Beauty of Gardn (C8570); Charmed Garden (B8573) |
 |
| by Marj Marion Frame Overlay Die from Cheery Lynn Stamps: Chop (100 Proof Press) Dragon (unknown and unmounted) Ginko Punch: Carl Corners: Candi's |
Learning to make paper beads was the challenge on Sunday afternoon in John Petersen's class. Usually students in John's classes are chatterboxes; there were several interludes of silence because we were so busy focusing on what we were supposed to do. And, as usual, we also had moments of explosive laughter!
We designed our own paper using Tsukineko's Brilliance ink pads, Fireworks! sprays, and stamped images (optional). At the same time, we were also decorating our metal ring piece with Tsukineko's StazOn ink pads and Imagine Crafts' Glaze On! After cutting out the paper strips, we rolled the paper strips one at a time around a wooden skewer, using Imagine Crafts' Creative Medium to keep the rolled paper together and also to set the finished bead with one last light coating. All of that was followed up with the actual 'beading' which was quick once we were familiar with the stitch. Most of the bracelets shown were still 'works in progress'.
 |
| some of the Tsukineko products we're using to make our beautiful papers and medallion . . . Fireworks!, Brilliance & StazOn inks |
 |
| we've made our beautiful papers (some stamped onto the paper and some didn't); StazOn used on the metal disk, layered with Imagine Crafts' Glaze On so we could layer colors onto the metal disk |
 |
| a pattern is found on the reverse side of the designed paper so we could then have a pattern to cut our paper strips from |
 |
| by Debbie Gaetz |
 |
| by Sam Lee |
 |
| by Verna Cleveland |
 |
| by Laura Leach |
 |
| by Susie Tracy |
 |
| by Mary Esperanza |
 |
| by Dianne Johnson |
 |
| by Jerri Huebner |
Join us for John Petersen's next class at Art 'n Soul . . . Saturday, August 11, from 12:00 noon to 4:00 p.m. We'll show you what that project will be later this week. In the meantime, if you haven't signed up yet, you'll want to as soon as possible because John's classes always fill up fast, even before we know what we're doing!
From Elizabeth Craft Designs . . . a beautiful Christmas card from Els at Elizabeth Craft Designs, using one of the new peel-offs she designed, should get your holiday spirits going! I love how she used both the positive and negative parts of the peel-off.
From Penny Black's blog . . .
by
CARD SUPPLIES:
From Elizabeth Craft Designs . . . a beautiful Christmas card from Els at Elizabeth Craft Designs, using one of the new peel-offs she designed, should get your holiday spirits going! I love how she used both the positive and negative parts of the peel-off.
 |
| by Els van de Burgt for Elizabeth Craft Designs "Made this card using Peel Off designs nr 969 in gold and 310 Seasons greetings on gold. Coloring was done with the Tombow makers on watercolor paper. For the berries I used Peel Off sticker 7018, glitter dots in red, and for the borders the 7010 glitter lines in red (Love the glitter dots and glitter lines). On the card I used a strip of our Be Creative tape with the Micro fine glitter Sweet Basil (MFP 99). On top of that I used the negative parts from the Holly and transferred that onto the tape using the Transfer Sheets (nr 600). " |
From Penny Black's blog . . .
Thanks a Bunch by Kathy
'Kathy Racoosin is here! She is sharing a pretty Thank You card using Petal Party, a Designer favorite'
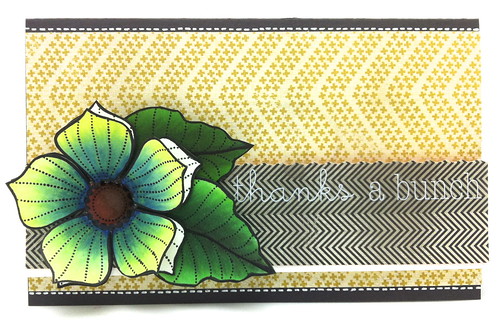 |
| "Hello Friends, I have a quick share today... a card I created for the Penny Black blog. You may have noticed that I love this flower stamp from PB called "Petal Party" The shapes of the petals are so pretty and have a geometric look to them that I like. Here is another card that I recently made with the stame transparent set of stamps. |
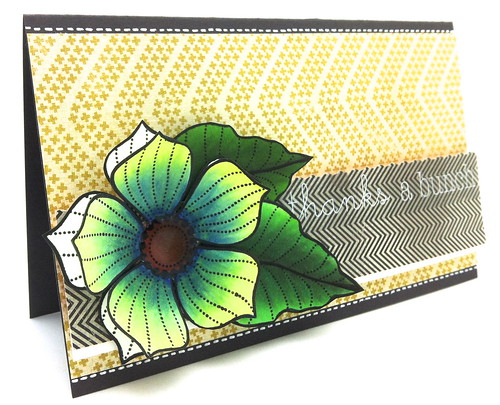 |
| My images were colored with Copic markers. ( I used YG21, YG41, BG96, YE21, B06) Stayed tuned because soon I will be sharing some unusual color combos when coloring with Copics or alcohol markers. The paper are scraps from my August card kit from Simon Says Stamp. I will be giving away a new card kit EACH month so you may want to subscribe for my blog updates so you don't miss out. Click here for that. The sentiment is from this sticker sheet....gasp a sticker... yes! I love them ! ...and I love how they are available in white too. |
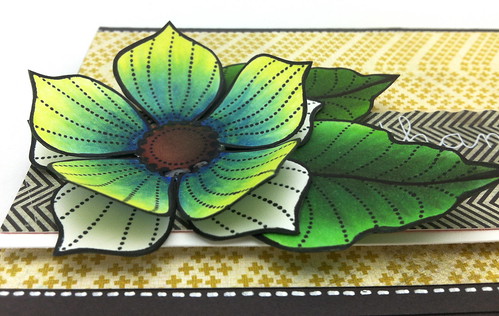 |
| Have you seen my UTube video's demonstrating how I color? I used the same technique on the flower as I did in this video. Once I move I plan on doing more videos on a regular basis & if you would like to subscribe click here and click on "Subscribe" on top of the video). After you adhere your flower to your card don't forget to put a heavy coat of glossy accents in the center. I love using these small bottles." |
 |  | ||
Goodies from the "What's in the Box" from Memory Box have been very popular. Before the entire new collection is shown to the public, we are going to submit another order this week. If you haven't seen everything or haven't written up your 'pink sheet' order, you need to submit it right away . . . please call the store (360.357.6820) or stop in at Art 'n Soul to put your order in now. My Memory Box order is going to be rather lengthy and I need to take it into the store tomorrow.
This Saturday is August 4, the first Saturday in August. It's Recycled Rubber . . . bring your excess treasures into the store by tomorrow (Wednesday) for Recycled Rubber this Saturday. Recycled Rubber starts at 10:00 a.m.
This Saturday is August 4, the first Saturday in August. It's Recycled Rubber . . . bring your excess treasures into the store by tomorrow (Wednesday) for Recycled Rubber this Saturday. Recycled Rubber starts at 10:00 a.m.
No comments:
Post a Comment