From Spellbinders . . . I love the technique they're featuring.
| Summer time - Sweet Life |
| by Beate Johns |
"I love summer. I LOVE sunshine, beach vacations and big red cherries. Growing up my family always got cherries from our neighbors every summer. We would eat until we couldn't eat anymore and my Mom would can the rest. So for my summer card, I used a cherry image.
Spellbinders™ Paper Arts Supplies:
Patterned Paper, Sanding Block, Sewing Machine, Button, Embroidery Thread, Alcohol Based Markers, Scissors, Mechanical Pencil
To start my card I stamped and colored an image from Flourishes Peaches & Cherries stamp set. I placed the third largest Standard Circles LG die over the image and marked around the edges where the image was too big for the circle.
 I started cutting directly to the point that sticks out the furthest from your die and cut around it. I erased the pencil lines and slipped the cut out parts of the image over the die (so they won't be cut when the paper is run through the Grand Calibur). The image was cut and embossed with the Grand Calibur Machine along with a plain piece of white cardstock that was cut and embossed with the largest of the Splendid Circles dies.
 The image circle was adhered to the Splendid Circle die cut with Scor-Tape. A strip of patterned paper was adhered to a bigger piece of the same paper pack. A piece of 5" x 11" piece of paper was scored at 5 1/2" for the card base.
 The card base was cut with the second smallest Grand Labels Twenty-Three die, the patterned paper with the second smallest Grand Rectangles die.
 The patterned paper rectangle was embossed with the Mystic M-Bossabilities folder. The paper was sanded and the edges were stitched.
 I threaded ribbon through one of the Splendid Circle openings and added SCRAPBOOK ADHESIVES BY 3L™ Dimensional Foam on the back.
 The image was adhered to the patterned paper and a bow was tied underneath. A sentiment from the Peaches & Cherries set was stamped on piece of white cardstock, that had been cut and embossed with a die from the Home Sweet Home. The tag was tied to the bow with a button and embroider thread. Another piece of white cardstock was cut with the same Grand Label Twenty-Three die used for the card base. Scor-Tape was added to the card base.
 The card front was adhered to the card base. Part of a Fancy That! Border bling was used to finish off the card.


| by Beate Johns for Spellbinder Paper Arts |
- Spellbinders Grand Calibur® Machine
- S4-114 Standard Circles LG
- S4-354 Splendid Circles
- LF-132 Grand Rectangles
- EL-006 Mystic M-Bossabilities
- LF-347 Grand Labels Twenty-Three
- S5-089 Home Sweet Home
- Flourishes - Peaches & Cherries stamp set
- Want2Scrap - Fancy That! Border Bling
- Scor-Pal® - Scor-Buddy, Scor-Tape and Scor-Mat
- SCRAPBOOK ADHESIVES BY 3L™ - Dimensional Foam
Patterned Paper, Sanding Block, Sewing Machine, Button, Embroidery Thread, Alcohol Based Markers, Scissors, Mechanical Pencil
To start my card I stamped and colored an image from Flourishes Peaches & Cherries stamp set. I placed the third largest Standard Circles LG die over the image and marked around the edges where the image was too big for the circle.
I hope you enjoy the sunny days ahead with the abundance of good fruit. Have a wonderful day!
Hugs and smiles"
From Copic's blog . . .
 Guest Post: Fabric Folds by Brandi York
May 29, 2012
 "This week, artist Brandi York shares tips on creating realistic fabric folds with Copic markers. Enjoy!

 I move next to V25, laying in the middletone values. I use V22 to soften the edges where the value shifts, leaving it sharper under the folds. I keep in mind the direction of my light as well as the direction the fabric is moving. In many areas, because of the art nouveau style, the lines are already there to dictate which way the fabric is moving. In most of my normal work this would not be the case, so I keep in mind how the fabric is falling. If you’re unsure, you can always drape a bedsheet between two hangers and play with the folds, or wear a coat or dress and take photos of yourself to get the idea of what you’re trying to render. Folds will always be the darkest areas, so I go in and keep layering the V25 until it won’t get any darker.


One of my favorite things about Copics is the ability to change your mind. Now, granted, I probably couldn’t go in at this point and decide to make her blonde, but I was able to change part of the drape of the gown to the same shades of pink (RV66 and RV32) that are in the stones in the border. I used the RV66 and some more of Y21 to add some bits of color elsewhere in the gown, again to emphasize the colors and depth of the gown. For the last kick of dark, I used BV29 in the deepest shadows (as well as some RV66 for some variation).

I finish off the whole piece with a Sakura Gelly Roll in white. The beauty of this pen is once dry you can tone the white, as I did in her hair.
 Hope you’ve enjoyed this little bit of artistic geekery!"
 "This week, artist Brandi York shares tips on creating realistic fabric folds with Copic markers. Enjoy!
In this tutorial, we’re going to cover rendering folds in fabric. I’m touching on my geek roots again, mixing a bit of Alphonse Mucha with World of Warcraft (e.g., Warlock) and having a ball. In this tutorial, as always, I will be using Copic Sketch markers with a Copic Bleed-resistant Sketchbook.
At this point, I’ve rendered the majority of the piece (although things often change and get touched up as I go along), leaving the gown for last. I picked out my color scheme ahead of time, mostly to try and make sure everything would mesh in the end, particularly with the green flames. I began with a hint of G20 around the edges of the gown, mainly to help draw the green into the gown, despite the fact that it will be purple in the end. Consider it a reflected light from the flames behind.
Beginning with V22 I start to lay in the base color of the gown, careful to leave where the G20 has been laid in. I use the G20 to blend the edges of the two colors together, to create a little more of a glow affect. I moved quickly, not worrying too much about streaking as I hit the skirt of the gown, as most of that will get darkened up.
I move next to V25, laying in the middletone values. I use V22 to soften the edges where the value shifts, leaving it sharper under the folds. I keep in mind the direction of my light as well as the direction the fabric is moving. In many areas, because of the art nouveau style, the lines are already there to dictate which way the fabric is moving. In most of my normal work this would not be the case, so I keep in mind how the fabric is falling. If you’re unsure, you can always drape a bedsheet between two hangers and play with the folds, or wear a coat or dress and take photos of yourself to get the idea of what you’re trying to render. Folds will always be the darkest areas, so I go in and keep layering the V25 until it won’t get any darker.
At this point, I layer some Y21 into the deeper folds for three reasons – one, complementary colors. Yellow and purple are opposites, so one will significantly darken the other. (Although due to the nature of Copics, it will lighten until I layer V25 over it again.) Secondly, it will warm up the shadows, creating a nice contrast to the cool shade of the gown. And third, it draws the color of the background though the piece.
Next, V28 to further darken the folds and shadows. There is a bit of push and pull here at this stage, darkening a good majority of the gown, while maintaining the values we’ve laid in prior. To further push the glow of the green, and enhance the tone of the gown, I layer G20 over the whole of the gown. This brightens the lighter edges of the folds and seems to bring a new depth to the whole gown.

One of my favorite things about Copics is the ability to change your mind. Now, granted, I probably couldn’t go in at this point and decide to make her blonde, but I was able to change part of the drape of the gown to the same shades of pink (RV66 and RV32) that are in the stones in the border. I used the RV66 and some more of Y21 to add some bits of color elsewhere in the gown, again to emphasize the colors and depth of the gown. For the last kick of dark, I used BV29 in the deepest shadows (as well as some RV66 for some variation).
I finish off the whole piece with a Sakura Gelly Roll in white. The beauty of this pen is once dry you can tone the white, as I did in her hair.
Hope you’ve enjoyed this little bit of artistic geekery!"
Tutorial colors: G20, V22, V25, V28, Y21, RV32, RV66, BV29
Complete colors: G20, V15, V22, V25, V28, Y21, Y23, Y32, RV32, RV66, RV91, RV99,
BV20, BV23, BV25, BV29, R000, E00, E01, E02, E04, E19, E27, E34, YR24, YG21, YG23, YG25
Complete colors: G20, V15, V22, V25, V28, Y21, Y23, Y32, RV32, RV66, RV91, RV99,
BV20, BV23, BV25, BV29, R000, E00, E01, E02, E04, E19, E27, E34, YR24, YG21, YG23, YG25
From Cheery Lynn . . . by Jeannie DeGruccio.
When is a circle a square?
"Do you like that title? The reason that's my title is because the main part of this card is made out of the Reflections Dies Scalloped Circle Set. I wanted to point out a couple of things about the REFLECTIONS DIES.

They are very versatile, you can mix and match the sets, you can use
them for cards, scrapbook pages and even sentiments and tags.

This card not only uses the Scalloped Circle Reflections set, but also the Mini Pearl French Flair set.
On the dark blue base you can see how elegant the Mini Pearl French Flair is.

I also used the Mini Pearl French Flair to create all my sentiment tags.

The tags were then embellished with rub-ons, Flourish Leaf Strip, Pretty Petal and mini pearls.
Here you can see how this unique card opens up.

You can see how the card is created with the 4 circles.

It is opened and closed the same way you open and close a packing type box.
Here is the inside all decorated also.
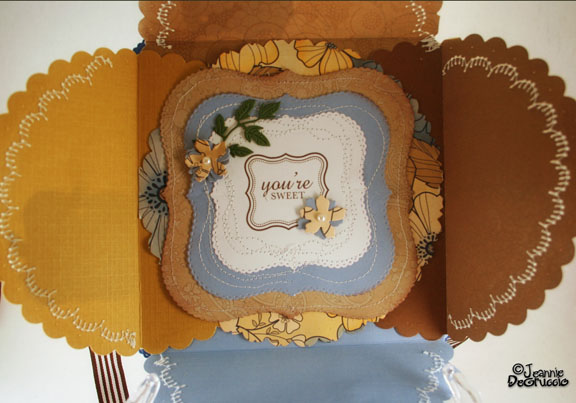
I just love this type of card!

I hope you can see just how much fun you can have with our Reflections Dies. The possibilities are endless. It is like buying 3 types of dies all in one shot. Scrapbooking, card making and tag/sentiment dies all in one!"
See you very soon!
No comments:
Post a Comment