
IMAGINE Crafts and RubberMoon Art Stamps are excited to share with you the amazing projects that our design teams have created to kick off the Holiday Season! Over the next few days, we'll be sharing with you inspiration and techniques using IMAGINE Crafts' line of ink products featuring rubber stamps from RubberMoon.
Be sure to visit the IMAGINE Crafts and RubberMoon blogs daily for more projects and ideas!
To say I like RubberMoon Stamps is an understatement because I L-O-V-E them! They’re so quirky, so witty, and so unconventional. I was thrilled to learn that IMAGINE Crafts would be collaborating with RubberMoon Stamps this month.
For my first project, I had to do something with the clock kit. As I write this posting, the clock is working perfectly . . . the time is correct and the second-hand is rotating around the clock very nicely. My first real mechanical achievement!

SUPPLIES USED:
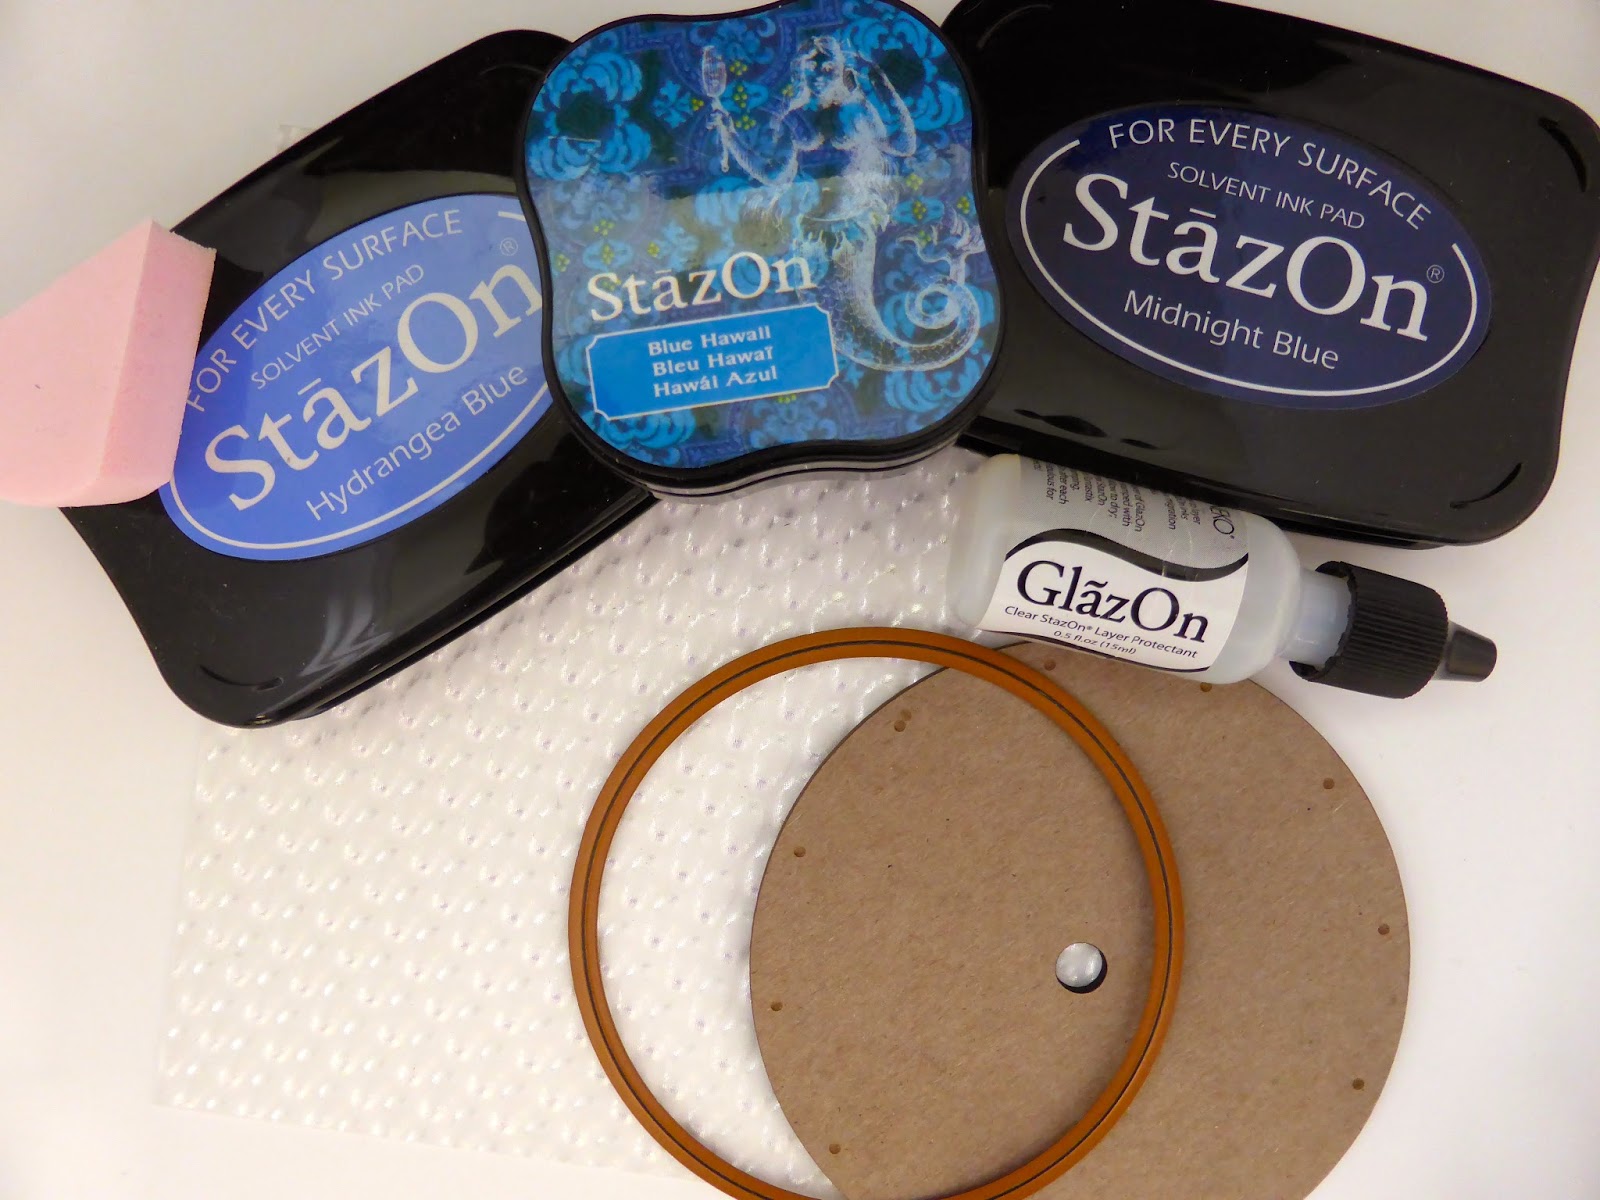
- IMAGINE Crafts: irRESISTible Pico Embellisher in Wedding White; irRESISTible Craft Spray in Danube Blue; Embossing Powder in Clear; GooseBumps Texture Spray in Shimmer; InkBlushers; Vertigo in Prism
- IMAGINE Crafts/Tsukineko: Tack ‘N Peel Reusable Cling Sheet; StazOn Midi solvent ink in Blue Hawaii; StazOn solvent ink in Hydrangea Blue, Midnight Blue; GlazOn Original; StazOn Opaque in Cotton White; VersaMark Water-Based ink in Clear; VersaFine Pigment ink in Toffee, Majestic Blue, Satin Red, Deep Lagoon; Sheer Shimmer Spritz Shimmery Craft Spray in Frost
- RubberMoon: Time for Mixed Media - Clock Kit; what was i thinking stamp (ge2756); Kae Pea Sun Sweet art stamp; Sunny art stamp; see the moon stamp (kp5010)
- Spellbinders’ Standard Circles SM Nestabilties (#7) S4-116; Sizzix Big Shot die cutting machine and metal adapter plate; Tombow Mono Liquid Glue; wooden toothpick; Japanese Hole Punch; adhesive flat-back crystals (source unknown); AA battery for clock
DIRECTIONS:
Die cut the Vertigo with the largest circle nestability die. Be sure to use the metal adapter plate to ensure a clean cut; pass the die and Vertigo through the die cutting machine several times.
With the InkBlusher, dab the StazOn in Hydrangea Blue onto the backside of the Vertigo. Allow to dry; then apply a thin coating of the GlazOn* with an InkBlusher. Allow to dry. Dab on the StazOn in Blue Hawaii; allow to dry and then apply another thin coat of GlazOn. Allow to dry. Dab on the StazOn in Midnight Blue; allow to dry and apply another thin coat of GlazOn. Allow to dry.
*GlazOn allows you to layer StazOn colors without color migration, allowing the integrity of each color to remain true. It also allows you to layer another color without also picking 'up' the previous color when the solvents in each react to each other.
Apply a piece of Tack “n Peel to the backside of the unmounted sentiment stamp, and adhere to an acrylic stamp block. On the front side of the Vertigo, stamp the RubberMoon sentiment stamp in the center with the StazOn Opaque in Cotton White.

Coat the base (top and sides) and clock face (front and back) with Memento in Pistachio to give them an underlying weathered look. Allow to dry. Coat both sides of the u-post with VersaFine in Majestic Blue. Allow to dry.

Stamp the “i love the moon” sentiment stamp with the Red Satin around the edge of the circle, and stamp it in Majestic Blue around the center. After it has dried, spray with the clear GooseBumps and let dry. On the other side, stamp the sun face stamp in Majestic Blue around the perimeter of the clock (face side up) so there are stamped lines showing on the outside edge of the Vertigo. After it is dry, spray with the Shimmer Spray and allow to dry.

Apply VersaMark to the entire surface of the base, apply the Clear Embossing Powder and heat set. Do this twice. Then spray the base with the Danube Blue irRESISTible Craft Spray. Spray heavily in 2-3 areas and with a toothpick, draw the color out in all directions to form ‘legs’. Allow to completely dry.
Coat the number ring with the VersaMark in Majestic Blue. Allow to dry. For an “icy” look, apply the Pico Embellisher in Wedding White along the lines of each number; allow to completely dry.

Lay the Vertigo on top of the clock face, making sure to keep it in place when you turn the clock face over to the backside. Using the backside’s center hole, cut a center hole through the Vertigo with the Japanese hole punch. Make sure the hole is big enough to allow the white and yellow tip of the clock mechanism. Assemble the remaining pieces of the clock (hands, washer and hex nut). Glue the number ring around the Vertigo.

Follow the remaining directions for the clock assembly that is in the kit, including inserting a AA battery into the clock mechanism. Set the hands to the correct time. Adhere an adhesive flat-backed crystal to each corner of the base.
Enjoy your RubberMoon clock! Because of the Vertigo and depending upon the lighting, the clock face might appear as if it is floating in space.
 |
| by Debbie Gaetz Artist-in-Residence for IMAGINE Crafts |
My personal thank you to RubberMoon for their generosity when supplying us with their stamps and Creative Clock Kit.The uniqueness of RubberMoon stamps really helps the creative process!
To see wonderful artistry and creativity using IMAGINE Crafts' and RubberMoon products, go to this link and scroll through this past week: http://imaginecraftsblog.com/2014/11/29/perfect-pairin…bermoon-stamps/ .
No comments:
Post a Comment