 |
| by Debbie Gaetz Artist-in-Residence for IMAGINE Crafts®/Tsukineko® |
Stamp the image twice. The first time, stamp it with IMAGINE Crafts®/Tsukineko® Memento Luxe™ Mixed Media Pigment Ink in Gray Flannel on Neenah Classic Crest 80 lb. cover card stock in Solar White. Emboss with IMAGINE Crafts® Embossing Powder™ in clear.Use an IMAGINE Crafts®/Tsukineko® Jumbo Dauber™ to apply ink color to the edges with IMAGINE Crafts®/Tsukineko® Memento™ Dye Ink in Morocco and Pistachio.

The second time, stamp the image in IMAGINE Crafts®/Tsukineko® Memento™ Dye Ink in Pistachio. Over the face only, apply IMAGINE Crafts®/Tsukineko® VersaColor™ Pigment Ink in Fresh Green. Emboss with IMAGINE Crafts® Embossing Powder™ in clear.

With detail cutting scissors, 'fussy cut' the inside oval of the witch in the mirror as shown below in the photo. Color the background of the cut-out around the witch's profile with Sakura's Gelly Roll Stardust Glitter Pen in Copper Star. With the Sakura Glaze 3-D Glossy Ink Pen in Black, outline the outside oval as shown in the photo.

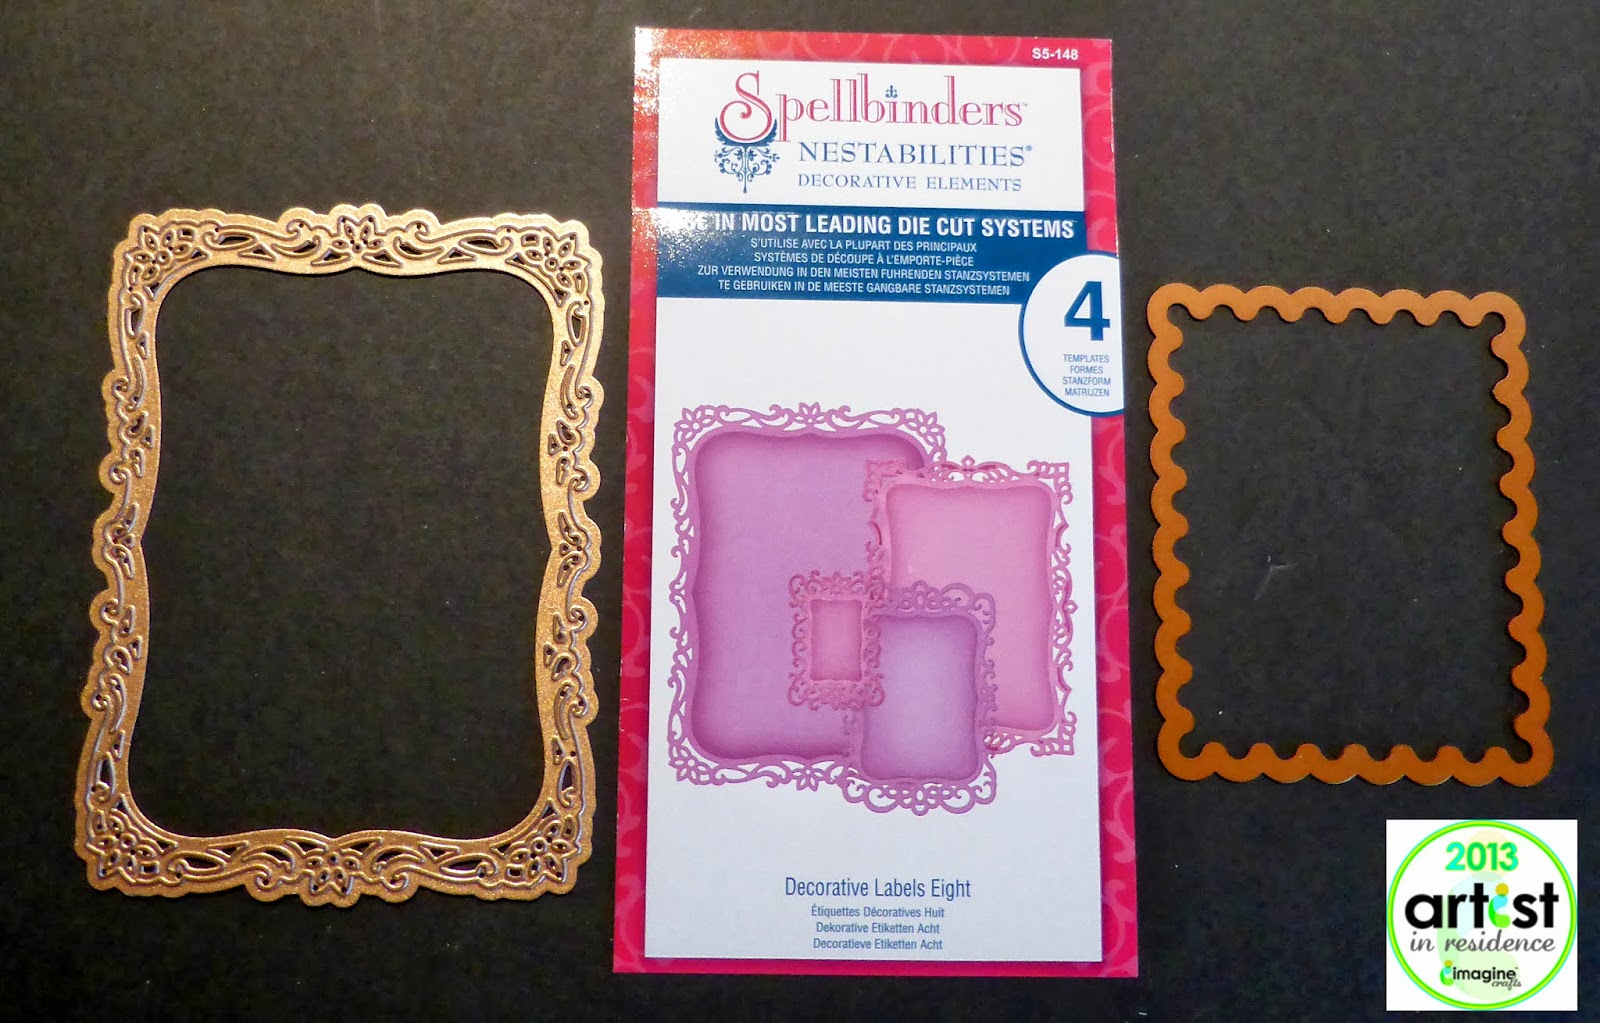
The Steampunk Spells collection from Graphic 45 has wonderful Halloween papers. Select the Tick-Tock paper to die cut a frame using two dies from Spellbinders®: Classic Scalloped Rectangles LG (S4-133) and Decorative Labels Eight (S5-148). Use the Decorative Labels Eight first, and then cut the Scalloped Rectangle inside the paper die cut.
Trim the stamped image so it doesn't show through the die cut edges. Adhere behind the frame at the top and bottom. Trim a card stock in black 1/4-inch less than an A-6 card size. Trim a piece of Elizabeth Craft Designs' Shimmer Sheetz in Fire Opal Gemstone (SS-0218) 1/8-inch less to fit inside the black card stock and adhere with a double-sided adhesive runner. Adhere the framed stamped image to the Shimmer Sheetz. Place the cut-out witch's profile over the gray embossed oval with foam mounting tape or Pop Dots to add dimension.

You should see the Shimmer Sheetz coming through the intricate die-cut edges of the frame. Adhere the cover card top to the Stardream Metallic A-6 pre-folded card in lavender.

I really appreciate your 'viewing time" today. It's always fun to share how wonderful the inks and other products are from IMAGINE Crafts®/Tsukineko®. I'll be back later this month to show you my Artist's Choice project.
This card will be one of 3 cards featured in my Halloween Card Class at Art 'n Soul next month.
SUPPLIES USED:
- IMAGINE Crafts®/Tsukineko® Memento Lux™ Mixed Media Pigment Ink in Grey Flannel
- IMAGINE Crafts®/Tsukineko® Memento™ Dye Ink in Pistachio and Morocco
- IMAGINE Crafts®/Tsukineko® VersaColor™ Pigment Ink in Fresh Green
- IMAGINE Crafts® Embossing Powder™ in clear
- IMAGINE Crafts® Jumbo Daubers™
- Stampendous! Wood Mount Stamp (2013): Mirror Mirror (R176)
- Spellbinders Nestabilities: Classic Scalloped Rectangles LG (S4-133)
- Spellbinders Nestabilities Decorative Elements: Decorative Labels Eight (S5-148)
- Elizabeth Crafts Designs Shimmer Sheetz in Fire Opal Gemstone (SS-0218)
- Pop Tones Card Stock in Black
- Neenah Classic Crest 80 lb. Cover Card Stock in Solar White
- Stardream Metallic Pre-Folded A-6 Card in Lavender
- Graphic 45 Steampunk Spells 12x12 Card Stock: Tick-Tock
- Sakura Glaze 3-D Glossy Ink Pen in Black
- Sakura Gelly Roll Stardust Glitter Pen in Copper Star
No comments:
Post a Comment