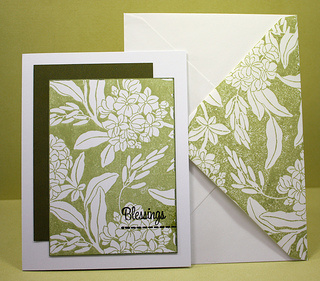
This is another card we'll make in my Iris Folding Class at Art 'n Soul on Sunday, February 24, beginning at 1:00 p.m. The sample board is at the store.
 |
| by Debbie Gaetz for Iris Folding Class on February 24 |
From Elizabeth Craft Designs . . .
"Another YOUTUBE! How to cut Shimmer Sheetz with the Elizabeth Craft Designs Dies. What works and what doesn't!
http://www.youtube.com/watch?v=vrNiCQszXNg
http://www.youtube.com/watch?v=vrNiCQszXNg
I hope those links worked for you; if not, please let me know and I'll try to figure out another way. If you're a subscriber to Facebook, search "Elizabeth Craft Designs" and scroll down to this particular posting.
From Penny Black's blog . . .
"Penny Black designer Cathy Andronicou is ever-so-clever! She recycled the packaging from one of her Slapstick cling stamps to create ta wallet for her sweet little notes and envelopes. Check out her video for a how-to, and have a happy Saturday. We’ll see you back here tomorrow for another day of Take Flight Twenty!

Edited to add: and the video’s live!
Here are some pictures of each card – definitely covered for many occasions!


Materials used:
Penny Black - Blissful 40-205, Edge to Edge 30-164, Tree-mendous 30-165, Friendship 30-160, Embellishments 30-161, To You 30-067, Mix and Match Cardstock - Fern Green 05-001, 05-003, Summer Sun 17-003, Clear Skies 10-003 and Fuchsia Fantasies 13-002.Other: Versafine Onyx Black Ink, Versamark Ink, Various colours of Memento Ink, Clear and White Embossing Powder, Spellbinders Labels 20, Alcohol Pens, Envelopes, Vellum and White cardstock."
From Imagine Crafts, AIR Taylor Usry shows us her latest project using the new Tsukineko Kaleidascope in Tomato Vine . . .
From Imagine Crafts, AIR Taylor Usry shows us her latest project using the new Tsukineko Kaleidascope in Tomato Vine . . .
Look Deeply Into Nature
"I'm really excited to be sharing my first post as an Artist in Residence for Imagine Crafts/Tsukineko! I'll have three great projects to share with you throughout the month (and again each month!); today I'm sharing my "artist's choice" project. I was challenged to use any Tsukineko products I wanted to make a project of my choosing.


Thanks so much for stopping by to check out my project today! I'll have anther one to share very soon!"
Supplies:
Stamps: Pinescape (Crafter's Companion)
Card Stock: Bazzill
Patterned Paper: For the Record (Echo Park)
Ink: Memento Bamboo Leaves, Peanut Brittle, Rich Cocoa, Morocco; Versamark; Kaleidacolor Tomato Vine (Tsukineko)
Accessories: Frost, Copper Shimmer Spritz (Tsukineko); Clear Embossing Powder (Stampendous)
Tools: Heat Tool, Sponge

 |
| by Taylor Usry for Imagine Crafts |
I had a great time getting inky to create this card! Below are step-by-step instructions for how I made it, and what pretties I used:

I started with one of my favorite stamp sets, Pinescape (from Crafter's Companion US and UK). I gathered a few supplies to stamp with as well - several Memento Dew Drops (Peanut Brittle, Bamboo Leaves, Rich Cocoa, and Morocco - this color palette was inspired by a new Kaleidacolor ink pad (Tomato Vine), my well-used Versamarkpad, card stock, clear embossing powder (Stampendous) and a sponge.

I inked up a small tree stamp first with Versamark, and then immediately over the with the with Peanut Brittle ink, stamped it off on scratch paper, and then stamped it on my card stock (I repeated this step twice). Then I inked up my large tree stamp first with Versamark, and then immediately over the with the Rich Coca (I inked first with Versamark to ensure that I would have enough time to emboss and heat set the images).
I poured clear embossing powder of all of the images, and used my heat tool to set them (Tip: I heat from underneath my card stock, to reduce the powder that may blow all over the place).

I used a sponge to begin adding color to my entire 4 5/8" x 4 1/8" card stock. Peanut Brittle was sponged on first, moving toward the middle of my panel so that area would remain the lightest. I added Rich Cocoa to the outer edges as well.

I repeated the sponging process, this time using Bamboo Leaves at the bottom (for grass) and Morocco at the top. I used the Rich Cocoa pad to add ink directly to the edges of the panel as well, for more definition.
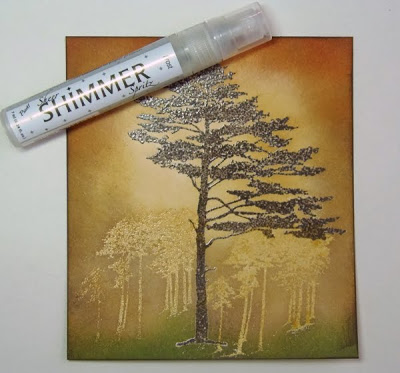
I finished my main image panel with a bit of Frost Shimmer Spritz - I really love the whole line of these sprays! I laid my card stock down flat on my craft table (I line it with paper, to protect my surface from ink when I sponge, and the excess spray, or whatever other mess I might make!), held the spray about six inches away, and spritzed until I was happy with the coverage.

I repeated the entire sponging and spray process with a piece of patterned paper, for another layer on my card. I stamped the tree line image in Rich Cocoa ink, and added Copper Shimmer Spritz to this as well as the Frost.

I also repeated the process for my small sentiment panel. I inked up trees with Bamboo Leaves, stamped it off once on to my scratch paper and then stamped it behind my sentiment (which I used Rich Cocoa for). On this piece I only used the Frost Shimmer Spritz.

I really love the shine that the shimmer spray gives to a finished piece!

Paired with the shine from the embossed image, it looks really great - I can't wait to send this card to someone!

Supplies:
Stamps: Pinescape (Crafter's Companion)
Card Stock: Bazzill
Patterned Paper: For the Record (Echo Park)
Ink: Memento Bamboo Leaves, Peanut Brittle, Rich Cocoa, Morocco; Versamark; Kaleidacolor Tomato Vine (Tsukineko)
Accessories: Frost, Copper Shimmer Spritz (Tsukineko); Clear Embossing Powder (Stampendous)
Tools: Heat Tool, Sponge
No comments:
Post a Comment