"There’s no shortage of times where we are thankful for both simple kindnesses and grand gestures extended to us, and as temperatures drop and the calendar pages fly (seriously – it’s NOVEMBER already!?), here in the States, we are especially thankful around Thanksgiving. With that in mind, our designers scoured Pinterest for inspiration with the theme of “gratitude” – would you like to see what they created?
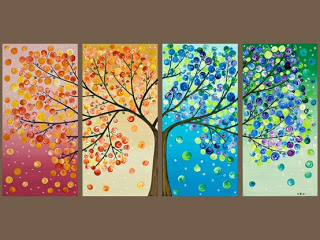
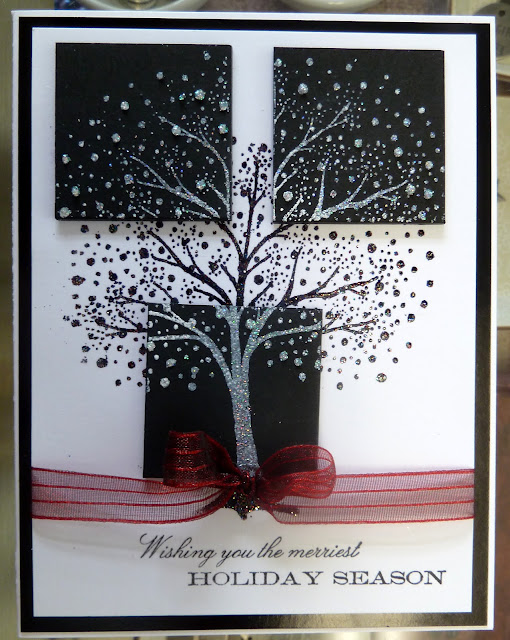
Heather was inspired to create this beauty (go to her link by clicking on her name at the start of this line) to see how she created this beautiful card using Tsukineko's Memento inks
 |
| by Heather Telford for Penny Black |
after seeing this piece of art:
She used Thanks, thanks and Fantasy as well as Memento inks, markers, and clear embossing powder."
Dianne couldn't sleep the night she saw this Penny Black tree stamp used by Heather, so she stayed up way past her 'jammie' time and made her own beautiful holiday cards that are on display at Art 'n Soul . . .
 |
| This is the Penny Black stamp that started it all . . . Fantasy 3880K |
We're lucky Dianne was restless and just had to make these cards; unfortunately, Dianne had to work the following day and it was Recycled Rubber! Thanks, Dianne!
From Millsrepco's rep in San Diego showcasing a Memory Box holiday die . . .
"Snowflake Wreath from Memory Box
 Memory Box Products:
- Frostyville Wreath Die #98418
- Leaping Deer Die #98390
- Peace, Love and Joy B1114
- Sapphire Notecards 33040
- Twinkle Shimmer Card Stock
- Silver micro fine glitter
- Be Creative tape sheet
- Clear domes and white pearls
- Design Adhesive glue
- Foam squares
- ribbon
- Cover white cardstock (4" x 5") with double sided tape sheet. Die cut wreath on cardstock side (it's harder to cut on the release paper side).
- Peel away release paper, sprinkle silver glitter on sticky side of die cut wreath and press glitter into tape for a strong hold.
- Make sure to punch out any tiny pieces of the design that may have remained.
- Carefully apply wet glue (use fine tip bottle) to reverse side of glittered wreath and position on navy panel (4" x 5 1/8"),
- Apply pearls and clear stones to wreath.
- Die cut Leaping Deer from twinkle cardstock. Tie ribbon scarf and adhere with dot of white glue. Hold in place until dry and secure. Attach foam squares to back of deer for elevation and position in center of wreath.
- Stamp sentiment then layer with red card stock. Use foam squares for elevation.
- Repeat above steps until you've made enough for all your friends and family (snicker)."
From Cheery Lynn Designs, one of the most adorable 'new baby' cards I've seen in a while . . .
Video Tutorial, Vintage Inspired Baby Card
"This week for Cheery Lynn Designs I have created a baby card, using a range of Cheery Lynn Designs dies. This card would certainly look beautiful in pink or blue! I used the Oval Classic Stacker Series, to form a frame, and dressed it up using ribbon.
 |
| by Sandie Edwards |
Instructions:
1. Use a small piece of blu-tac between Oval Classic Stacker Series dies to hold them together. This stops dies moving and you will achieve an evenly cut frame.

2. Die-cut your frame from chipboard, using the Oval Classic Stacker Series dies. 3. Set aside middle of die-cut to use in a future project. 5. Place a small glue dot on back of cut frame, adhere ribbon and begin to wind around the frame. 6. Continue carefully winding around frame until the whole frame is covered. 7. Affix ribbon in place with another glue dot on back of frame. 8. Die-cut Manon's Wedding Garland twice, cutting between the details as pictured above.
9. Adhere Manon's Wedding Garland to the back of the frame using a strong adhesive. 10. Insert fine lace in the same manner as above, though on the inside of the frame. 11. Use the same shaped Oval Classic Stacker that you created with, to draw around the photograph or image you wish to have featured in the frame. Cut out, and affix to the back of frame.
A simple technique, which looks very striking!
. . .
Till next week"
Sandie
Supplies List:
Oval Classic Stacker Series
Lace Corner Deco A
Sentiment Frame #1
Iris Leaves
Manon's Wedding Garland
NiceCrane Designs - Bessie Gutman Pack
Seam Binding Ribbon
Spun Straw Distress Ink
AC Cardstock
Helmar Adhesives
Blu-Tak
Kaisercraft Mini Sticker Letters
Kaisercraft Crystal Jewel
Stocking up for next year's Halloween? All of our Halloween items at Art 'n Soul are 30% off and in a box up by the front counter next to the discount paper box . . . it's going fast so please be quick to look!
Have you signed up for Suzanne Glazier's classes coming up soon at Art 'n Soul? Or Susie's Notecard Gift Set class? Pleae call the store (360.357.6820) or stop in to sign up as soon as possible.
Sunday, November 11, 12:00-1:30pm, Suzanne Glazier – “BOTTLECAP PENDANTS” $25
Learn to make unique and interesting pendants using the supplies that Suzanne will supply. Now you won’t have necklaces that look like everyone else’s. How cool is that? Perfect for Christmas or Holiday presents! Please bring your Basic Kit.
 |
| by Suzanne Glazier for Pennywise Arts |
 |
| by Suzanne Glazier for Pennywise Arts |
 |
| by Suzanne Glazier for Pennywise Arts |
 |
| by Suzanne Glazier for Pennywise Arts Sunday, November 11, 2:30-5:30pm, Suzanne Glazier – “CHRISTMAS STAR” $25 |
Construct a beautiful star decoration with a bottle cap embellishment at its heart! These incredible three-dimensional stars are over 13” across and are made completely of paper! Learn how easy it is to create one of your very own with templates from Pennywise Arts. Pretty to hang from the ceiling, spruce up wedding decorations, or even adorn the top of your Christmas tree. A variety of paper designs will be available. Not all will match the store sample. Please bring sharp long blade scissors, a bone folder, and a scoring tool (12” ruler with a stylus or large sized Scor It board).
 |
| by Suzanne Glazier for Pennywise Arts |
Sunday, November 18, 1:00-4:00pm, Susie – “NOTECARD GIFT SET” $32
Many customers have wanted a class to create the Magenta gift box, with 10 cards and envelopes decorated to insert in the box. What a tremendous gift you can create for a friend. Please see the samples available at the store — but there are endless possibilities for the cards. You will select the outside paper by either bringing your own 12 x 12 sheet, or you may use what is available at the store. Please bring any Copic markers you may have, as well as your basic class kit. Susie will provide colored pencils.
 |
| by Susie Tracy |
I'm looking forward to this week because we are not traveling anywhere this week. Want to know what my immediate wish is? It is that when I wake up from tonight's sleep, it is actually Wednesday morning, Nov. 7. Any guesses as to why?


No comments:
Post a Comment