From Millsrepco, this beautiful card using Imagine Crafts/Tsukineko USA products that we love so much . . .
Vintage Card

From Heartfelt Creations, look at this beautiful card from Glenda Brooks . . .
 | Products Used in This Project HCPC 3467 Woodland Growth PreCut Set Labels 20 Mega Nestabilities Classic Oval Lg Oval Small Other Supplies: Canson Watercolor Paper, Memento Ink, Sizzix Embossing Folder (Leaves) Ranger Distress Inks, Scor-Tape, Seam Binding, embossing ink, embossing powder Instructions: Card Size 4 1/4" X 5 1/2" "Make card base out of watercolor paper for stability. Cut a piece of watercolor paper 4 1/4" X 5 1/2"; use distress ink and roll onto embossing folder, emboss the watercolor paper putting the color into the design . Next I rolled embossing ink over the raised part of the embossed piece and used the embossing powder and heat embossed this raised part to add a little more dimension to the card. Stamp the image onto a piece of watercolor paper and color with distress inks; cut out using the oval die and then cut a label out of watercolor paper. Edge the oval with distress inks and attach to the label die cut. Tape this to the embossed piece of watercolor paper. Color and scrunch a piece of seam binding and attach a strip down the side of the piece. Tie a bow and attach to the strip. Attach this piece to the card base and you are finished!" CREATED BY: GLENDA BROOKS |
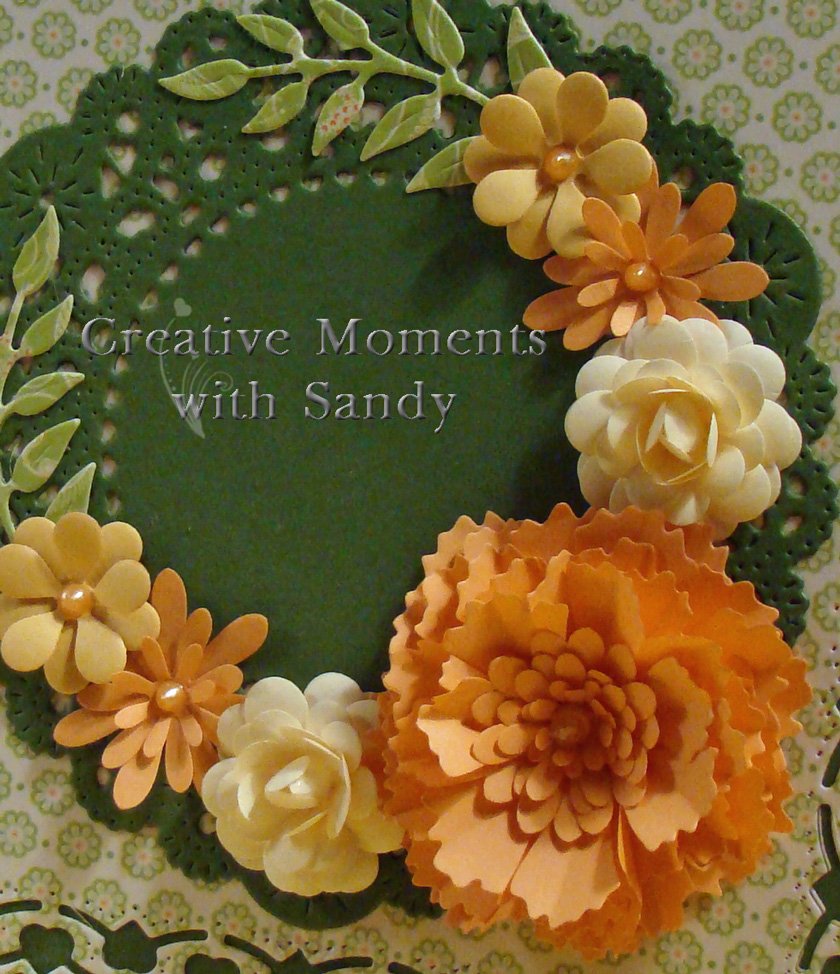
From Cheery Lynn, a great dry embossing technique for your flower petal dies . . .
Cheery Lynn Designs Rose dies
"Cheery Lynn Designs gets lots of emails from people who want to make flowers like they see here on the Inspiration blog. One of those requests was to explain how to make roses with the Miniature, Medium and Large Rose dies. So I have done a step by step tutorial that I wanted to share with you today.
You will need 3 of each size rose petals, an embossing pad, a stylus tool and some wax paper. Text weight paper works the best but you can certainly use card stock as well.

You are going to dry emboss each of the petals on the backside of the die cut, but first rub the paper with your wax paper. It will make the stylus glide easier. Start from the outer edge of each petal and using a circular motion, emboss each petal towards the center.
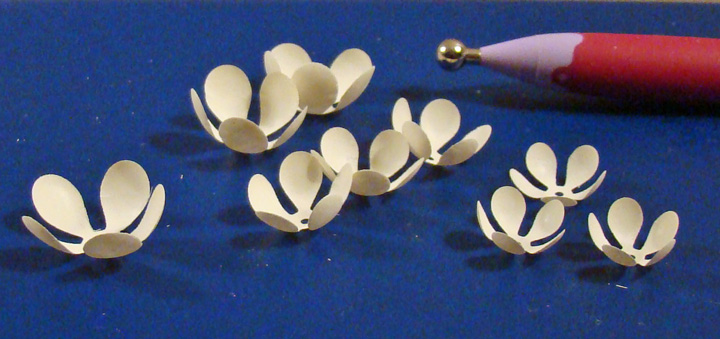
This will cause the petals to curl up like the above photo.

The next step is to flip each petal over, except for two of the smallest ones, and dry emboss the center so they look like the above photo.

Now start gluing each petal on top of the other being sure to turn them so they are staggered. Above you see two of the largest petals layered. I place just a bit of glue in the center then carefully place the next petal.

Once you get all three large petals layered, continue with the three medium petals, gluing each separately and staggering the petals.

Add the one small petal that you dry embossed in the center. Your flower should look like the one above.

Now take the two remaining small petals and glue them on top of each other with the front sides down. Once the glue has dried you can dry emboss in the center to make them cup upwards as shown above.

Now glue these two cupped upwards petals into the center of your flower. One last step....

Take 3 petals from the top flower, add some glue on the top inside edges of each petal, pull them towards the center and glue them closed like the above photo. This will create a center bud. You can then fluff your petals a bit and you are all done!

So the rose I created for the tutorial is the one you see in the foreground that I didn't use, lol. The two smaller ones on my card were created with 4 medium and 4 miniature petals. The little yellow flowers on the ends are also miniature rose dies, I just dry embossed and layered them. The large orange flower was created with four layers of Sweet Williams die and two layers of Darling Daisies in the center. (Thank you, Jodi, for that combination of dies). The smaller orange flowers are also Darling Daisies. The leaves are Olive Branches. The center of the card is a French Pastry Doily. For the background panel I used my Lace Square Heart Reflections die. Finished size is 5" square."
From Magenta . . .
Assorted Card and Envelope
"Here's a little project very simple and fun, it's an assorted card and envelope set that is so perfect for gifts and we can add some dimension cause of the way the envelope is built. To make my project I chose a white cardstock base for the card and enveloppe and I decorated them with the most recent Magenta Paper Collection, Color me Softly. I found that project on the blog of one of my collegue DT, Aqua from the DT Scrapbook ta vie. A pretty project fun to make and that can let our imagination roam free.


Step to follow for the envelope:
- A piece of 12x12 cardstock that you'll cut at 8inches
- With the leftover paper piece make 2 pieces of 3x5
- You'll have to fold the 8x12 to the following marks :
at 3", 3.5", 8" and 8.5"

- the two 3x5 pieces have to be folded like an accordion every 1/2 inch

- Once folded your papers should look like this:

- Now you have to glue the sides to the base of the envelope. You have to glue them on the smaller side which will be the bottom of your envelope (you can also decorate the inside before gluing the sides if you want)

- Once glued your enveloppe will look like this.

- To keep the envelope closed you can put a mini velcro, magnets of a ribbon, according to your taste.

The card you'll put inside has to be 4.25 x 6.75 once folded.
Voilà, now you just have to decorate it!"
Pascale Plourde - DT Magenta
No comments:
Post a Comment