
The Cheery Lynn Wickers and Weavers dies are going to be even more popular when Marj teachers her "Artfully Woven" Class on May 1. I took pics of her sample board with my iPhone and I emailed them back to me a long time ago . . . cyberspace is taking a lot of time tonight and I can only hope the emailed pics arrive by tomorrow (lol!). As you would expect, the class samples are stunning . . . come on into the store to check them out. And sign up early . . . this class is gonna fill up quickly!
Tuesday, May 1, 5:30 -8:00pm, with Marj, ARTFULLY WOVEN, $30
Come explore the Cheery Lynn "Wicker and Weaver" unique dies that make paper weaving Oh! so much easier and artistic. You'll make three gorgeous cards, each with a different style that will feature ribbon, stamping, Pan Pastels, and decorative paper. Marj will share very helpful tips on construction and weaving patterns. You will receive class instructions, and there will be extra samples for your inspiration. Please bring your Basic Kit, small trimmer, die cut machine and appropriate plates, and your Wicker and Weaver dies if you already have them. (Note, if you are coming with a friend, two people could share a machine.)
Marianne Designs' website had this helpful posting on how to use the Cuttlebug with your Marianne Designs' dies . . .
Working with the Cuttle Bug
"Always carefully try if the specified combination works on your machine. Experience has shown that what works for one machine, sometimes doesn’t for another machine. The thickness ( the grammage) of your paper helps in the determination of the different plates. If you use thicker paper (eg. 250 grams) you get a better result in embossing.
Caution! Never try to force your machine to run the plates. If it does not fit the stack is too thick. Switch the C-plate for the B-plate or if the B-plate is used with 3 sheets of cardboard / plastic, remove one of the sheets carefully and try again.
Cutting Method• Place the plates A and C or B with a straight cut sheet pile on one another.
• Put your Creatable with cutting side face up (not at the edge but in the middle of the plate) on the plates.
• Paper with right side face down. Place where necessary a mat on top (not with its edge against the edge of the plates A and C / B, but well over the Creatable and paper).
• Place plate B with the edge against the other plates. Try to use plate B front and back alternately so it doesn’t bend so much. But with a curved plate you can easily continue working.
If you use the Cuttlebug like this you push the start of the plates easily through, the rest will follow naturally.
Embossing Method• Place the plates A and C or B with a straight cut sheet pile on one another.
• Put your Creatable with cutting side face up (not at the edge but in the middle of the plate) on the plates.
• Paper with right side face down. Place where necessary a mat on top (not with its edge against the edge of the plates A and C / B, but well over the Creatable and paper).
• Add a silicone mat or a black emboss mat between the paper and plate B.
• Place plate B with the edge against the other plates. Try to use plate B front and back alternately so it doesn’t bend so much. But with a curved plate you can easily continue working.
• To protect an embossing mat and to make sure the Creatable embosses better place a bit of cloth between the paper and plate B, then you cut the cloth and your mat lasts longer."
Here are pics of the SEI papers I talked about earlier today . . . I'm not going to show the Vanilla Sunshine set because it sold out immediately. I'll try to order more because it was a cute set.
 |
SEI'S FIELD NOTES and the papers inside (2 of each design shown) |

And the 12x12 SEI papers that are on the spinning rack . . . be sure to look at both sides because the backside is just as gorgeous as the front side!
 |
| SEI's DESERT SPRINGS COLLECTION -- Bright Angel Trail (embossed) |
 |
| SEI's DESERT SPRINGS COLLECTION -- Vasey's Paradise (embossed) |
 |
| SEI's DESERT SPRINGS COLLECTION -- Sugar Daisies (glittered) |
Susie's been busy again, much to our enjoyment . . .
 |
| by Susie Tracy Stamp: The Artful Stamper Colors: Prismacolor Pencils Background Paper: Paper Parachute Dies: Cheery Lynn Stacker Flower #2 & Dutch Scallop Square Frame (DL140) |
 | |
|
 | |
|
From Elizabeth Craft Designs . . .
 |
| by Els for Elizabeth Craft Designs |
From Magenta's blog . . .
Photo Paper Embossed Resist
"With spring officially with us and as the weather slowly turns warmer... I feel the need to create with bright and fun colours. I created this cheery card to share with you using an embossed resist technique. This is a fun and easy yet very effective way to stamp a pretty card.
 |
| by Cassandra for Magenta |
Magenta products:
Tranquil Buds stamp
If nothing ever changed there would be no butterflies stamp
ME214 Artful Flowers patterned paper
Other supplies:

4x6 satin photo paper
Clear emboss powder
VersaMark stamp pad
Distress ink in 2 colors
StazOn black stamp pad
Distress ink applicators
card stock
First, stamp your image using versamark on the photo paper and then cover with clear emboss powder. Tap off excess and return to the jar. Heat emboss using the heat gun. Be careful not to overheat and bubble the photo paper.
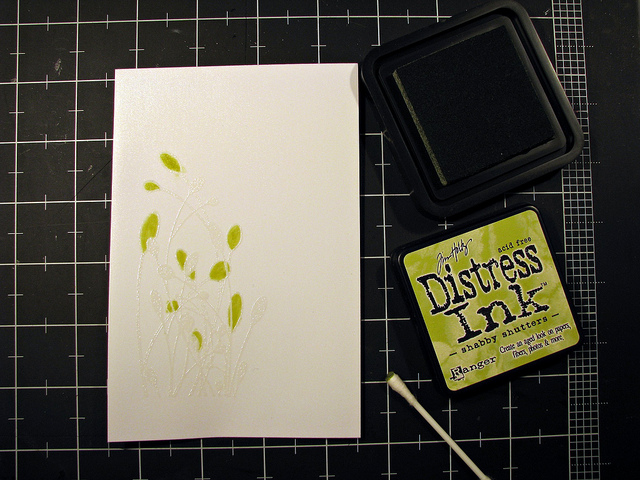
Using a Q-tip as an applicator, carefully fill in the leaf image centres where there is only an outline. For this technique, it is key that your first colour choice be either complimentary to the secondary colour or be the lighter colour of a blend to get the desired end colour result.

Next, place your photo paper on a scrap piece of paper as this step is a little messy. Using the distress ink applicator, begin applying the ink using a circular and sweeping motion to blend the ink. Make sure to go right off the paper to cover the entire surface. You will see your stamped image appear as you add colour everywhere. By using complementary colours, I was able to go right over the green and only change the hue slightly which makes it really easy to apply the colour in this case. Using the stamp pad, ink the edges to create a darker border fine line. Allow to dry.
Using the black StazOn ink and your sentiment stamp, stamp on to desired location on the altered photo paper. Mount onto the black card face cardstock. Then punch out desired shape embellishment, in my case butterflies which fit with the stamped sentiment. Adhere to the stamped image and one randomly higher up and bend wings upward. Add a little sparkle to the bodies and the card is done.
 |
| by Cassandra for Magenta |
Finally, share with a friend to bring them some cheer."

DT Magenta
That's about all for tonight . . . a little shut-eye and we're off and running for the week. The new Memory Box Make-n-Take starts tomorrow and Deb is anxious to share the new design with you . . . it's a beautiful butterfly die cut; both Dianne and Deb have been busy making the kits. The photo was taken today but it's with the other photo that's crawling through cyberspace to me. Again, it's $1 or a non-perishable food item for the Food Bank barrel per make-n-take. As we learn how this program works, we're finding out NOW how the paper order works; unfortunately, they didn't tell us this when the program started so we're going to be a little behind on this one because they're taking 2-3 weeks to fill orders :( !
So we'll do the best we can!
P.S. Did any one April Fool you today?
No comments:
Post a Comment