Thursday, February 2, 2012

At 10:00 a.m. tomorrow morning, Recycled Rubber begins at Art 'n Soul. In the 'stash', I saw some stamps that have never been used, Dreamweaver Stencils that have never been used, and some Spellbinder Nestabilities sets. Being early will help you find these treasures!


Please forgive the blog layout; I'm working out some kinks (I hope!).


More images from Dreamweaver Stencils at the CHA Show:


This is my personal favorite!


I think it's time to bring out my Dreamweaver stencils again, along with my Zentangle patterns. And if I don't have that bunny stencil, I'm going to have to add it to my collection because it's going to be perfect for Easter cards this year!


From Outlines Rubber Stamps . . . another 'open catalog' company just waiting for you to fill out a pink order sheet.


"Our Outlines Monday challenge theme this week is to.....

Challenge 37 - Follow your Heart


Follow your Heart: Use Hearts on your card.

We would like you to join this challenge for a chance to win a $25 Shopping Spree at Outlines Rubber Stamp Co.  To enter the challenge you must use only stamps from Outlines; only one entry allowed  Please add the URL to your actual blog post or online gallery to the InLinkz you will find at the end of this post. Please do not link to your main blog.  Also, please link back to our challenge in your blog post  or gallery..

So let's see what our design team has created for you this week.
Jeanne Streiff
Stamps used:  E-807 Tall Heart Cake I-552 Small Dot Background


Jenny Gropp
Stamps used: F-693 Triple Heart, AA-845 Tiny Happy Love Day


Julie Warner
Stamps used: I-797 Split Layering Collage - Baby, AA-834 Tiny Congratulations


Kecia Waters
Stamps used: I-1005 Hearts for You


Lisa Silver
Stamps used: D-884 Venus Jewel


Sue Kment
Stamps used: AA-845 Tiny Happy Love Day, F-1141 Valentine Posy Centers


Please add a link to your blog post or online gallery. After you click the Add Your Link button, you will be taken to another page.  Please click on the pic of your card and it will appear as a thumbnail above your name.  Please remember, you must use only Outlines Rubber Stamps to enter the challenge."


Little Love Notes
Add to Bookmarks
Print PagePrint PDF


Cards by Jenny Gropp
All of these cards feature paper from Bo Bunny’s Enchanted 6x6 Paper Pad.

All of the cards are 8”x4”, folded in half to make a 4”x4” card.


CARD 1
Stamps:F-693 Triple Heart
C-419 XOXO


Stamp the heart, cut it out and then hand cut a small black border.

Add a little red mat to the XOXO sentiment, cutting it out to look like a banner.

The heart die cut is from Cheery Lynn and I added a white mat behind the die.
Use a Copic R46 to add color to half of the stamped heart.

Create the card base as shown, using red, white, black and printed-paper from the Bo Bunny pad.

 Pop up the die cut heart on the card front using foam tape.
 Add the stamped heart using foam tape to raise it up.

Use lt. Siam Size 7 Swarovski Crystals to the polka dot areas of the heart.

Use Picksey Pick Ups and Glossy Accents to add the crystals.
Using Maraschino Baker’s Twine, I tied a loopy bow and used Ultimate Glue to adhere it in the middle of the heart.

I bent the sentiment in adding a little curve to make it look like a waving banner.

I used Dimensional Silicone under the banner to keep the curve in place.
 You can see the silicone under the bend in the banner in this picture.

When it dries, it will hold the curve perfectly.
Here is a picture of the finished card.
 CARD 2
Stamps:
C-363 I Love You
E-678 Tulip Square Large
 Stamp the tulips and then carefully cut them out.

Stamp the sentiment and add black and red mats.

Bend the sentiment just like on the first card, adding a little curve to it.
Use Copics to color the little flowers.Copic Markers:
R 29, 46, 83
YG 61, 67
You can see here that both stamped pieces have a little curve, you can use a pencil or just gently curve the paper over you finger to add a little dimension.
I used Dimensional Silicone to add both pieces to the card base.

The Silicone will dry clear and keep everything curved and popped up when it dries.
You can see the dimension in this picture.

The tulip ends are tucked beneath the sentiment banner.
Here is a picture of the finished card.
 CARD 3
Stamps:
F-1141 Valentine Posy Centers
AA-866 Tiny Hugs to You
Stamp the images using Memento Tuxedo Black.

Cut the sentiment in to a banner shape and add a little black mat.

Stamp the hearts twice and cut them out as shown.
Use Copics to color the stamped white heart.Copic Markers:
R 43, 46
Build the card base as shown.

I used Circle Nesties and Fleur de Lis Motif dies from Spellbinders.

Use foam tape to raise up alternating layers.
Add the heart circles in the middle using foam tape to add dimensional.

Tuck the banner sentiment under the circles.
Add a little sparkle with Size 12 Clear Crystals on each Fleur de Lis.
I used a Viva White Décor Pearl Pen to add pearl embellishments in the bottom corner.
I added a coat of Glossy Accents over the center heart.
Here is the finished card.


From Tombow USA  .  .  .


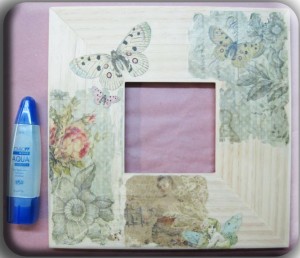
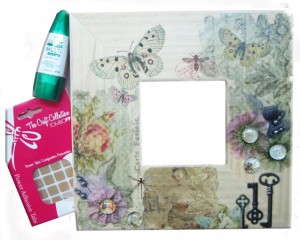
"Image transfer is a technique where you can adhere a piece of treated paper to a surface and render the image translucent. The sample shows a frame with the wood grain showing through the translucent image transfers for a romantic, vintage appearance. Light backgrounds usually work best with this technique but you can experiment with medium or dark backgrounds for interesting effects.
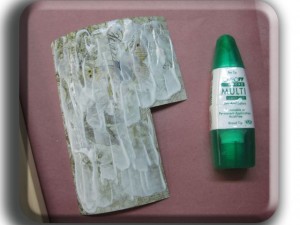
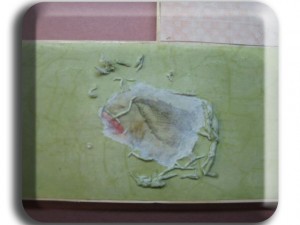
Step1: Apply a liberal amount of MONO Multi Liquid Glue to the front of the image using the broad applicator. Problems can occur if you do not apply enough glue. I left a slight unglued edge around the image that will give a distressed edge. If you wish a squared edge, make sure the glue is applied right to the edges. Immediately lay the image down onto the surface of the frame, image side own. Burnish softly with a damp cloth and avoid getting glue on backside of the image. Let the glue dry completely, overnight is best. With this technique, the image will be in reverse, so choose papers without words. If you want to use words with your own images, make a mirror image color photocopy (an ink-jet printer does not work).


Step 2: Spray the image with water and let it soak into paper. Gently peel off the paper by rubbing in small circles with your fingers. Remove the paper until you can see the image. If you scrub too vigorously, you may scrub away the image. Be gentle with the edges.
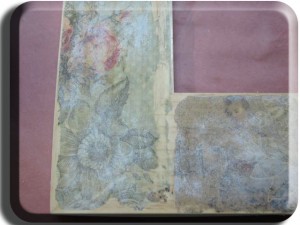


Step 3: Wipe off image and let dry – you can use a hair dryer to speed up the drying. When dry, you will see a white haze on the image, this means you need to repeat the water step and remove more paper. You can repeat this step until your image feels smooth. You will always have a little white haze on the image. It will disappear after you seal the image with two coats of clear matte acrylic  varnish.


Step 4: Motifs from the decorative paper are cut out and adhered using the MONO Aqua Liquid Glue. These are a nice contrast to the translucent images.


Step 5: Add your embellishments.  The keys were glued on with MONO Multi Liquid Glue and the flowers, bows and flat marbles with Power Tabs.
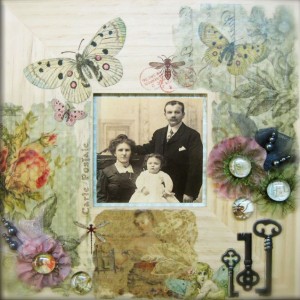


This is a fun project and would make a great gift. Give it a try, you’ll be amazed at the results.

Until next time, happy crafting…. "

Coming soon from Creative Images, a transfer medium that we used in John Petersen's class last month. Watch for it!


No comments:

Post a Comment

Followers