Cindy Sharp has been busy. She has 3 classes 'in a row' at Art 'n Soul and her class boards are up for your viewing at the store. She's bringing back the Rubber Stamp Tapestry (huge interest in these at the Stamp Carnival in Tokyo); taking you outside the typical box to make cards in the long rectangular size; and, organizing lots of fun for you with the Valentine Collage class (remember, she has more embellishments in her stash than most of us).
 |
| Tapestry Valentines on Sunday, January 23, from 12:30 to 4:00 p.m. |
 |
| Long Cards on Saturday, January 29, 2011 from 12:30 to 4:00 p.m. |
 |
| Valentine Collage on Sunday, January 30, 2011 from 12:30 to 4:00 p.m |
Marj Marion's class board for "Wine Lover's Delight" is up . . . I can't tell you how clever they are. Here's the simplest example from the board:
 |
| Wine Lover's Delight on February 8, 2011 from 2:00 to 4:30 p.m. OR 6:00 to 8:30 p.m. |

Please stop in at the store or call us to sign up for these classes now.
Stamps from Penny Black are in . . . you know the drill: the earlier you come in to purchase the stamps, the better selection you'll have. And you can also look over the Pan Pastels that are here, too!

 |
| In the upper left corner of the photo, do you recognize the tree stamp? We've used it for Christmas cards because it 'dresses' up so beautifully . . . it could be 'dressed' up beautifully for Valentine's cards, too . . . especially if you take the red mirror paper and punch out very small hearts! |
 |
| The photo is a little blurry . . . the store was semi-dark and I was doing my best to not fall on something I didn't know about! |
Sneak peek from Dreamweaver Stencils
From Lynelle Harlow's blog, DREAM it UP! on December 30, 2010:
 I like to think that Spring is just around the corner, even though New Year's Day 2011 is only two days away. These beautiful lovebirds (stencil LL3011) were stenciled by Elaine Benedict in the name of Love (stencil LG697). The birds were paste embossed with the regular embossing paste using the hinge technique. After they were dry she repositioned the clean stencil on top of the pasted image and stenciled the lovebirds with a variety of pigment and metallic inks. She started with a yellow green and then shaded with a darker color of kelly green on the lower half of the image. The yellow beaks and black eyes were shielded with the Picasso stencil shield (LL332), so that the the breasts and heads could then be stenciled bright red. The word "love" was paste embossed with the metallic gold paste and while it was still wet just a bit of gold glitter was added.
From Georgia Sommers' blog, Somm R Stamping, on January 13, 2011


Hi everyone, well it is Thursday again and I'm having trouble loading the sketch onto my blog.
For today's card I chose to do something simple, and will be using this in the class I will be teaching at Jazzy Crafts in Castsro Valley. I have had this paper for a while and I likeit because it has a kind of whimsical quality to it. The stencil I used for the the heart is LL567 by of course Dreamweaver stencils. I taped the stencil to ivory cardstock and rouged in Ranger distress ink, Spun Sugar, then around the edges I added Worn Lipstick. I punched the scallopped circle by using the Marvy scallop cirle punch (the large green one) , I then distressed the edges of t he circle by using the same colors of ink. I lateyed this beautiful ivory ribbon to black cardstock and then layered that to the card. I popped the circle w/heart off the card with mounting tape, after I had added the bling. Iwent around the heart with Stickles Frosted Lace Glitter glue and also added 3 rhinestones. I then stamped the forever friends (MSE) in the lower left corner.
This is a great but simple valentine for someone special in your life.
and from her January 6, 2011 entry:
From Sherry Cheeve's blog, Walkin' on the BAD Side! -- January 12, 2011


Finally, I placed the entire element on some printed paper, wrapped it with a bunch of baker's twine, added a pretty pink button and a card base, and called it a success!
SUPPLIES:
Spellbinders: S4-316 Heart Circles, LF-126 Grand Squares, GC-001 Grand Calibur (TM)
Stamps: "Seasons of Love - Tags" (Waltzingmouse Stamps)
Adhesives: 3D Foam Squares (SCRAPBOOK ADHESIVES BY 3L (TM), E-Z Runner(R) (SCRAPBOOK ADHESIVES BY 3L (TM), Mini Glue Dots - 3/16" (Glue Dots) , Zip Dry Paper Glue (Beacon Adhesives)
Paper: Cherry-O (CTMH)
Ink: Tulip (CTMH)
Accessories: Button, Baker's Twine
Now, here is a precious project that I dreamed up using S4-316 Heart Circles!
Cute, right????!!! While I was folding over the white heart border for the card, I realized that if I stood them up they would make a cute coaster....which I turned into the base for a cupcake liner!
See the little heart base at the bottom of each cupcake liner? Yep, that's S4-316 Heart Circles!
And I pulled out my F-013 Jewel Tones Premium Craft Foil (love it!) to use with the S4-316 Heart Circles to make the little cupcake picks. These were so much fun to play with!
Supplies:
Spellbinders: S4-316 Heart Circles, F-013 Jewel Tones Premium Craft Foil (Deep Red), GC-001 Grand Calibur(TM)
Stamps: "Seasons of Love - Tags" (Waltzingmouse Stamps)
Adhesives: 3D Foam Squares - Black (SCRAPBOOK ADHESIVES BY 3L(TM), Mini Glue Dots - 3/16" (Glue Dots), White Fast-Grab Glue
Ink: Tulip (CTMH)
Paper: Cherry-O (CTMH)
Accessories: #80218 Printed Grosgrain Ribbon (Creative Impressions), Sweethearts(R) Candy Hearts, Cupcakes
As a reminder, this is the Spellbinders product I introduced:
Heart Circles
SKU# S4-316
MSRP $24.99
Measurements:
1: 1″
2: 1¾″
3: 2¾″
4: 4⅛″

For today's card I chose to do something simple, and will be using this in the class I will be teaching at Jazzy Crafts in Castsro Valley. I have had this paper for a while and I likeit because it has a kind of whimsical quality to it. The stencil I used for the the heart is LL567 by of course Dreamweaver stencils. I taped the stencil to ivory cardstock and rouged in Ranger distress ink, Spun Sugar, then around the edges I added Worn Lipstick. I punched the scallopped circle by using the Marvy scallop cirle punch (the large green one) , I then distressed the edges of t he circle by using the same colors of ink. I lateyed this beautiful ivory ribbon to black cardstock and then layered that to the card. I popped the circle w/heart off the card with mounting tape, after I had added the bling. Iwent around the heart with Stickles Frosted Lace Glitter glue and also added 3 rhinestones. I then stamped the forever friends (MSE) in the lower left corner.
This is a great but simple valentine for someone special in your life.
and from her January 6, 2011 entry:
Two more new dies from Spellbinders . . .
From Sherry Cheeve's blog, Walkin' on the BAD Side! -- January 12, 2011
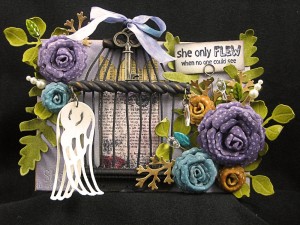
I’m thrilled to share S4-312 Blossoms Three and S4-328 Foliage with you. I’ve prepared two projects for you today, both have plenty of grungy goodness and fun elements.
The first is on a 5×7 flat canvas which has been colored with inks and misted with Eggplant Colorwash and Turquoise Perfect Pearls Mist.

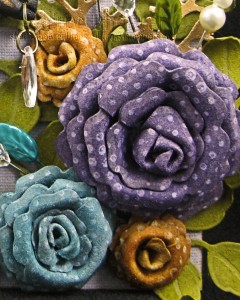
All the flowers, foliage and the wings are made from GrungePaper. The birdcage is made from some scrap hobby wood and florist wire that was painted black.

I’ve made a video for you showing how I made the flowers in both projects.
Product used for the above project:
- Stamps: Studio 490 It’s Face Art and Seriously Art by Stampers Anonymous from eclectic Paperie
- Ink/Paint: Ranger Archival Jet Black, Snowcap Pigment, and Old Paper, Wild Honey, Antique Linen, Dusty Concord, Broken China, Peeled Paint, Crushed Olive, Vintage Photo Distress; Ranger Turquoise Perfect Pearls Mist and Eggplant Colorwash, Gold and Black Acrylic Paint Dabber; Antique White Acrylic Paint
- Paper: Tim Holtz idea-ology Grunge Paper; Manila Tags
- Accessories: Spellbinders™ S4-299 Fallen Angel, S4-312 Blossoms Three and S4-328 Foliage; Ranger Mini Mister, Non-Stick Craft Sheet, Scattered Straw and Rock Candy Distress Stickles; Tim Holtz idea-ology Jump Rings and Memo Pin; Maya Road Trinket Pins, Dangling Chandelier Trinket Beads; Key; May Arts Ribbon; Florist Wire; Hobby Craft Wood Shelving; Sanding Tools
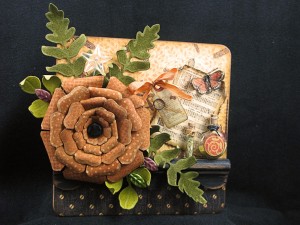
My second project is made from a 6×6 chipboard page that has been covered with designer paper. The flowers have been made a different way to show you the versatility of S4-312 Blossoms Three die templates. I’ll be back in a few days with more deets for this one.

Product used for the above project:
- Stamps: Studio 490 Forever Art and Seriously Art by Stampers Anonymous from eclectic Paperie
- Ink/Paint: Ranger Lemonade Pigment, and Rusty Hinge, Vintage Photo, Peeled Paint and Crushed Olive Distress; Ranger Black Acrylic Paint Dabber
- Paper: Graphic45 Botanicabella; Tim Holtz idea-ology Grunge Paper; Maya Road Chipboard Page
- Accessories: Spellbinders™ S4-312 Blossoms Three and S4-328 Foliage; Tim Holtz idea-ology Memo Pin; Maya Road Trinket Pins; Miniature Bottles; May Arts Ribbon; Hobby Craft Wood Shelving; Waxed Linen; Gold Micro Beads; Ranger Matte Accents and Claudine Hellmuth Multi-Medium Matte; Vintage Button; Sanding Tools
This is the Spellbinders product I introduced:

Blossoms Three
SKU# S4-312
MSRP $24.99
Measurements:
1: 1⅛″
2: 1⅞″
3: 2⅝″
4: 3¼″
5: 4⅛″
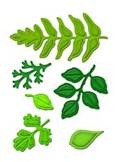
Foliage
SKU # S4-328
MSRP $19.99
Measurements:
1:⅝ x 1⅜”
2:¾ x 1½”
3: 1⅛ x 1¾”
4: 1½ x 1⅞”
5: 2 x 2½”
6: 2 x 4″
From Deborah Horton Young's blog, Scrapbook Czar -- January 12, 2011
I’m thrilled to share S4-316 Heart Circles Nestabilities(R) Decorative Elements with you!

The little heart borders on these die templates made them so much fun to play with! I decided to cut/emboss and stencil as many sizes and colors as I reasonably could on one card!

I didn't use the smallest one here, but I did use the largest one twice! Let me show you how! I used S4-316 Heart Circles #4, #2 and #2 (#1 is the smallest) on this project.

See how I was able to cut all of the die templates with one pass of the GC-001 Grand Calibur. Since I used the largest die template twice (with both red and white paper), I sent it through twice.

After I cut and embossed, I then poked out the little extra goodies with my paper piercer. I ended up with some sweet heart confetti - nice!

Next I snipped in-between each of the border hearts on the largest white die template.

I adhered the pink circle to the center and then folded the little hearts toward the inside of the circle, gluing them down with Zip Dry Paper Glue. I added the pink circle for contrast so that the white hearts would stand out.

I used my sponge dauber to stencil red ink through the smaller die template, which instantly gave it a contrasting border! The same ink was used to stamp the sentiment from Waltzingmouse Stamps.

I stacked the die templates, using 3D Foam Squares under for dimension. Can you see all of die templates that I cut and embossed? Then I adhered the stack to red and white cardstock that I cut and embossed with LF-126 Grand Squares.

Finally, I placed the entire element on some printed paper, wrapped it with a bunch of baker's twine, added a pretty pink button and a card base, and called it a success!
SUPPLIES:
Spellbinders: S4-316 Heart Circles, LF-126 Grand Squares, GC-001 Grand Calibur (TM)
Stamps: "Seasons of Love - Tags" (Waltzingmouse Stamps)
Adhesives: 3D Foam Squares (SCRAPBOOK ADHESIVES BY 3L (TM), E-Z Runner(R) (SCRAPBOOK ADHESIVES BY 3L (TM), Mini Glue Dots - 3/16" (Glue Dots) , Zip Dry Paper Glue (Beacon Adhesives)
Paper: Cherry-O (CTMH)
Ink: Tulip (CTMH)
Accessories: Button, Baker's Twine
Now, here is a precious project that I dreamed up using S4-316 Heart Circles!

Cute, right????!!! While I was folding over the white heart border for the card, I realized that if I stood them up they would make a cute coaster....which I turned into the base for a cupcake liner!

See the little heart base at the bottom of each cupcake liner? Yep, that's S4-316 Heart Circles!

And I pulled out my F-013 Jewel Tones Premium Craft Foil (love it!) to use with the S4-316 Heart Circles to make the little cupcake picks. These were so much fun to play with!
Supplies:
Spellbinders: S4-316 Heart Circles, F-013 Jewel Tones Premium Craft Foil (Deep Red), GC-001 Grand Calibur(TM)
Stamps: "Seasons of Love - Tags" (Waltzingmouse Stamps)
Adhesives: 3D Foam Squares - Black (SCRAPBOOK ADHESIVES BY 3L(TM), Mini Glue Dots - 3/16" (Glue Dots), White Fast-Grab Glue
Ink: Tulip (CTMH)
Paper: Cherry-O (CTMH)
Accessories: #80218 Printed Grosgrain Ribbon (Creative Impressions), Sweethearts(R) Candy Hearts, Cupcakes
As a reminder, this is the Spellbinders product I introduced:
Heart Circles
SKU# S4-316
MSRP $24.99
Measurements:
1: 1″
2: 1¾″
3: 2¾″
4: 4⅛″
Hi everyone, sorry this is late getting posted, but I'm still hobbling around on crutches and this week I'm also trying to get 2 quilt stands painted. Today's challenge is a express yourself challenge. I used this great paper to start with it white but it has glass shards on it in a paisley background, I saw it and just had to use it for this card. I mounted the white paper on Gold cardstock. Next I used the Be MY Valentine stencil (LM 276) and the Tole heart (LL3010) on black cardstock. I pasted both with gold matallic paste, then when they were dry I repostioned the stencil and dabbed a little of the stamp amd glue pad on the sm hearts. I added crystal glitter to give a little piazzaz. I then added a tulle bow to the layered cardstock and then layered the Be MY Valentine to the white paper. I cut out the heart and adhered it to the card using mounting tape to pop it slightly off the card. I think this card is perfect for the man in your life. It could also be done as an anniversary card.
Don't forget to hop on over to the rest of the teams blogs to check them out and also to the Dream It Up blog to see what's new there. I hope everyone is having a geat New Year and creating like crazy. I know I have alot going on in my brain, if I only had a few more hours in each day it would be great. See you all next week.
I can't wait to get my hands on this die!
Webster's Pages of their final 'sneak peek' collection . . .
Please join us in welcoming our fourth new collection {BIG} peek, Trendsetter! -- from January 13, 2011 blog
Welcome to DAY 4 of the sneaks leading up to CHA! We hope you enjoy our fourth really, REALLY {BIG} sneak!
Trendsetter was originally created for our B-side customers! Remember our Back side (B-side) challenge a year ago? ...a fresh, clean, slightly graphic and VERY fun & playful style of crafting. We will always love our flowers but why not mix into our collections a bit of trendsetting images, colors, whimsy & of course...BUTTERFLIES!??
Now you've seen our collection peeks! You have FIVE new collections to play with this release. You can now choose from classic Webster's floral & romantic designs to playful, fun, & whimsy with a bit of trendsetting graphics & colors. Your creations will be TRENDsetting with this collection!
Art 'n Soul = Creativity + Imagination + Beauty + YOU
No comments:
Post a Comment