I returned a day early from Palm Desert and earned the luxury of waking up in my own bed. When I looked outside, the morning couldn't have been more beautiful with the sun shining down through the bluest skies. And I can say with authority that the morning here was no less beautiful than the morning sun of yesterday . . .
 |
| Palm Desert, California . . . Wednesday, January 25 |
We're so lucky that Els keeps whipping these beauties out using Elizabeth Craft Designs' Shimmer Sheetz. After looking at this, I need to make sure I have this new color in the Shimmer Sheetz and the Copper StazOn from Tsukineko!
P.S. I was at the store today and the Fire Opal Gemstone Shimmer Sheetz is at the store on the back table!
From Spellbinders' blog . . .

1) The first thing I did was cut a card to be 4.25x 5x5 and I placed the top half of the card in to mynew Valor M-Bossibilites folder. (Have you heard about these folders? Oh my! One folder creates a cool design and then you can flip the same folder over to create a different design! Brilliant!) Okay. So that's the embossed card base.
2) Next, I adhered a 2 x 5.5 inch strip of pattern paper on the bottom of the card. Then I cut/embossed this gorgeous rectangle which I know you'll be seeing a lot of in my designs! LOVE it! For this card, I just wanted to use the intricate, lacy edge which I cut from the bottom and adhered on top of the pattern paper.


 |
| by Els for Elizabeth Craft Designs "I was a lucky lady when I received a package with some of the new Textured Impressions from the ''Bohemia'' collection designed by Rachael Bright. Can you believe that a card like this will cost you not more than 5 minutes to make? I used the new Fire Opal Gemstone Shimmer Sheetz and used the StazOn Copper and Black to give it this look." Note: the embossing folder designed by Rachael Bright is from Sizzix |
P.S. I was at the store today and the Fire Opal Gemstone Shimmer Sheetz is at the store on the back table!
From Spellbinders' blog . . .
| Heartwarming Vintage Card |
| by Julie Overby | Post Type: Card |
Hey everyone! I hope you all loved the Spellbinders™ Abilities and Beyond Blog Frenzy as much as I did! Congrats to all the winners of the give-aways!
I always anticipate what fabulous designs everyone makes and what cool, new products are being revealed during the blog frenzy.
The crazy thing about having so many wonderful new die templates to choose from is that I have so many faves and find myself wanting to show how you could use 'all' of them!
The card I am sharing today has quite a few new products (although I really had to hold myself back! LOL) I used the 'negatives' from the heart circles to form a subtle row of hearts with the intention that this could be used for Valentines Day, Anniversary, or any 'sweet' occasion! I will explain this technique in the tutorial.
Spellbinders Paper Arts Supplies:
- Spellbinders Grand Calibur®
- ES-003 Valor M-Bossabilities
- S5-008 Sewing Elements
- S5-079 Persian Motifs
- S5-090 Romantic Rectangles
- S4-116 Standard Circles SM
- S4-316 Heart Circles
Cross Promotional Companies:
- Bazzill Basics Paper®
- SCRAPBOOK ADHESIVES BY 3L 3D Foam Squares
- Scor-Pal® Scor-Tape
- Want2Scrap
Other:
paper, ribbon, button, glitter1) The first thing I did was cut a card to be 4.25x 5x5 and I placed the top half of the card in to mynew Valor M-Bossibilites folder. (Have you heard about these folders? Oh my! One folder creates a cool design and then you can flip the same folder over to create a different design! Brilliant!) Okay. So that's the embossed card base.
2) Next, I adhered a 2 x 5.5 inch strip of pattern paper on the bottom of the card. Then I cut/embossed this gorgeous rectangle which I know you'll be seeing a lot of in my designs! LOVE it! For this card, I just wanted to use the intricate, lacy edge which I cut from the bottom and adhered on top of the pattern paper.
3) To create a vintage feel, I cut/embossed a Persian Motif circle and then added some glitter. I kept my paper in the die template after embossing it and traced the inner circle with a glue pen. It wasn't a wide enough line for what I wanted so I used my Standard Circle die template on top as a stencil and traced that inner circle. After I removed it, I was able to 'color in' the adhesive with my glue pen so it was a much wider, yet precise ring and I was able to apply the glitter.
4) Using dictionary paper, I cut out a circle and adhered it to the center. Then I added the entire piece to my card.
5) I adhered two more strips of pattern paper and then tied a ribbon around and placed a button in the center.
6) In order to add a few tiny 'sweet' hearts, I cut'embossed the largest Heart Circle die template. All the little pieces from around the circle that follow are the negatives that would normally get tossed, unless your a paper artists who saves it all! I lined these up along the top edge of the pattern paper and then finished the row with a strip of pearls.
7) I cut/embossed a vintage looking dress form from the new Sewing Elements set and adhered a small bit of trim to the center of it using Scor-Tape. With foam squares a placed it in the center of the circle.
~ Designer Tip~
When using vintage print from old books, dictionaries and music, pay attention to the words that you are on the page before you adhere. You may be moving quickly and don't notice it but often someone else will! I made sure there wasn't anything offensive on my print but after having finished it, I wish I would have been specific about the words. Like maybe turn to the page that had the word sewing and cut it out instead rather than something random.
Hope this has been helpful and you've been inspired!
I think I had said before that the Hero Hues inks are really Tsukineko's inks that Hero Arts has re-packaged as their own because they match their colored papers that we've started to sell at the store. I thought I would share this color chart that came from Hero Arts' blog as an easy point of reference for you.
 Shadow Inks


Supplies:
Mailing tube and caps- Mine is about 3½ inches around by 40 inches long.
Small nails with a head about 1 ½ inches long I used 30, the more the merrier the sound will be!
Small fish tank rocks or-beads, beans, tiny nails, etc.
Medium size shells (Michaels)
Graphic 45 Tropical Travelogue papers 4500400
Graphic 45 Garden Isle papers 4500401
Graphic 45 Oceania papers 4500407
Colored gimp and trim - Mine reminds me of a little Hula Skirt!
Flat wooden h'orderve skewers (Dollar Store)
Tropical flowers (Michaels)
Moss (to hold the flowers and shells better to the top cap)


I think I had said before that the Hero Hues inks are really Tsukineko's inks that Hero Arts has re-packaged as their own because they match their colored papers that we've started to sell at the store. I thought I would share this color chart that came from Hero Arts' blog as an easy point of reference for you.
Hero Hues Inks
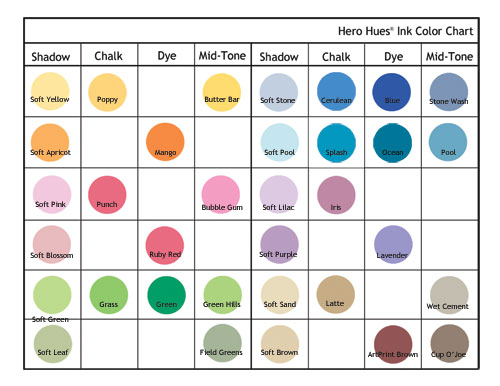
- Shadow inks are specially formulated to blend into paper surfaces leaving a soft translucent image.
- The Shadow Ink line is made up of pastel tones.
- Quick drying on matte papers.
- A perfect all around stamping ink especially with solid type images.
- Works best for Faux Letterpress and Stamp Layering techniques.
- Mid-Tone Shadow Inks are specially formulated to blend into paper surfaces leaving a smooth, soft image.
- Mid-Tone Shadow inks come in a variety of rich tones.
- A perfect all around stamping ink, especially with solid type images.
- Quick drying on matte papers.
- Perfect for Faux Letterpress and Stamp Layering techniques.
- A crisp bold stamping ink with a slight chalky haze.
- Chalk Inks come in a variety of rich tones.
- A perfect all around stamping ink for both detail and solid images.
- Quick drying on matte papers.
- Hero Dye Inks are permanent, crisp and waterproof.
- Dye inks come in a variety of rich tones.
- A perfect all around stamping ink for detail images.
- Quick drying on all paper surfaces.
- Great for stamping then watercoloring with paints.
Have you seen these nifty Hero Arts "Add Your Message" sets that include 4 woodblock stamps and 12 printed cards with white envelopes? We have 3 of the 4 designs; the 4th design was inadvertently omitted from our order and it's in the delivery system now. For a 'quick' card, it couldn't be easier unless you buy a card which I know all of us have sworn not to do!


It's one of the 'new items' we're trying out . . . please, let us know what you think. As I look at the pre-printed designs, I'm already thinking of how I can add my own personal touches with colored pencils, ArtQuest metallic water colors, glitter pens, glitter, embossing . . .
From Graphic 45's blog posting today, these are some stunning examples of paper crafting using their various paper collections by Carol Murphy . . . let me tell you, she rocks! Enjoy!
"We are very excited to introduce you to today's featured artist, Carol Murphy. One look at Carol's work and its obvious that she's a vastly talented artist. Her stunning style has been honed over the years to reflect a sentiment that is uniquely hers. She has a true knack for utilizing contrasting textures and layers in her papercrafting to create breathtaking and original works of art. All of Carol's projects radiate with beauty and joy that is truly inspiring. Each piece is like its own little world with its own distinct message. In addition to her lavish talent, Carol is also a fabulous teacher. She loves to share her passion for crafting with others in her wonderful tutorials and crafting classes. Today you will see a great variety of Carol's art and learn some awesome techniques in mini tutorials written by Carol herself! We are so happy to introduce you to the amazing Carol Murphy!
"I was so excited when I was asked to be a “Featured Artist” for Graphic 45! The combination of vintage images and muted colors makes this line a favorite of mine, as Graphic 45’s nostalgic appeal is so close to my heart. I have two wonderful sons, two beautiful daughters in law, and a lovely and very smart granddaughter, Zoë. My full time “day job” is working with Special Education kids and it has truly been my “life’s purpose” for the past thirty years. Even though I love it dearly, I’m looking forward to retiring in 2013 when I can devote more time to my art. On weekends and holidays I teach mixed media art classes incorporating lots of Graphic 45 into the mix. Growing up in the 50’s as an only child, art and creativity were a huge part of my life. When I was young I designed dresses for my paper dolls and was always busy with one craft project or another. In my late teens and early 20’s I made macramé belts, plant hangers, and jean skirts. (I’m sure some of you can identify with those) In my 30’s I created Victorian gift items and jewelry pieces that were sold at several consignment shops in the San Diego area. My love for paper crafting came about sometime in the early 90’s when all those stamps and papers changed from cutesy to cool! In 2005 I merged my passion for teaching with my love for art and began teaching both in-store and online mixed media classes. I absolutely adore using Graphic 45 paper collections and goodies. They encompass who I am as an artist; a little bit vintage- with an edge. My style is truly “controlled chaos” using lots of textures, layers, and colors. Too much is not enough is usually my motto! Because I have a very loose style, I find collage and mixed media to be a perfect outlet for my creative spirit. Creating little books and mini albums are my favorites; although I do like to expand my creativity by using these beautiful papers in my mixed media canvases, altered objects, and wall art. Featuring the scrumptious images from G45 makes everything so much easier and so much more fun." -Carol Murphy
Tropical Travelogue Rainstick
Many traditional cultures believed the sound of falling rain that rainsticks made could produce a storm. Thought to have originated in Central America, they have been found the world over bringing sounds of pitter patter to songs and meditation. I thought it would be fun to create one using the new Tropical Travelogue collection. This would also be a wonderful project for classrooms, church groups or scouts. Kids love making rainsticks! The tubes can be decorated to fit any theme and postcards, family photos and train tickets, etc. can be added for decoration.
Tips and Techniques:
Hammer nails in randomly and add a bit of glue to them before you nail them in (They go in very easily)
Cover the outside of the tube using various papers and overlapping here and there. Remember- this project has a top and bottom so be mindful of the paper and image orientation. Change out the colors and patterns. Paint the skewers black and attach. Add the gimp and trim to cover up the “change” lines between papers. I decorated the outside before I added the little rocks but that’s up to you. Paint the tube caps black and let dry. Add a dab of glue all the way around the INSIDE of the rim of the BOTTOM end of the tube and insert one of the tube caps.
Let dry well- you don’t want the innards to stick to the glue! Pour abut a cup of little rocks into the tube. The measurements will vary according to the items used. You can fiddle around with the sound a bit until you find the right sound and measurement for you. Insert the TOP tube cap in the same manner and make sure to wait until the last bit of glue is dry before turning it over to listen to the sound. Best to let it dry overnight. Adhere moss to the top of the cap. Add shells and flowers randomly creating a mound of goodies on top of the rainstick. Let this all dry well and then - let it rain!!!!!!!!!!!!
Supplies:
Mailing tube and caps- Mine is about 3½ inches around by 40 inches long.
Small nails with a head about 1 ½ inches long I used 30, the more the merrier the sound will be!
Small fish tank rocks or-beads, beans, tiny nails, etc.
Medium size shells (Michaels)
Graphic 45 Tropical Travelogue papers 4500400
Graphic 45 Garden Isle papers 4500401
Graphic 45 Oceania papers 4500407
Colored gimp and trim - Mine reminds me of a little Hula Skirt!
Flat wooden h'orderve skewers (Dollar Store)
Tropical flowers (Michaels)
Moss (to hold the flowers and shells better to the top cap)
School Days Altered Canvas
The new Alphabetical canvas by Tim Holtz is a perfect backdrop for Graphic 45’s An ABC Primer collection. These papers are just a yummy goodness of vintage school charm. I combined several papers and tags, wooden rulers, a handmade flower and clear embellishments, pencils, rosette die cuts and more to create this piece. If you look closely at the bottom right hand corner, you’ll see one of the little froggies that must have been hiding in one of the little boy’s pants pockets.
Tips and Techniques:
Rip small pieces of cardstock, layer up, and add scrabble tiles. Attach to canvas. Create the basic rosette, add the flower, and set aside. Find an image you want for the flower center. It must fit inside the flat marble shape. Add a bit of Diamond Glaze to the paper and place the flat marble on top. Let dry and cut out. Adhere to the center of the flower. To make the organza flower, simply cut six or seven circles and add a brad to the middle. You may need to poke a hole with a bead tool or awl first. Holding the center down with a chopstick or bamboo skewer, heat up the circles until they all shrink up and look like a flower. Add the decorative marble to the center. Tear around some ivory cardstock and the focal point image. Attach to the center of the piece. Add the frame, ruler, and clocks. (I also added some Diamond Glaze to the pale to add some interest) Layer up the tags and papers on the corners, adding brads if desired. Rap the pencils with decorative papers and attach to the sides of the canvas. Add file tabs and the little froggie in the corner. Voila! Piece of cake!
Supplies:
Tim Holtz Alphabetical canvas
Graphic 45 An ABC Primer 4500378
An ABC Primer Chipboard Die-cuts 1 4500392
An ABC Primer Chipboard Die-cuts 2 4500393
Assorted papers from the ABC Primer 8x8 Paper Pad 4500391
Scrabble tiles
12 inch wood ruler cut in half
Ivory and black Coredinations cardstock
Little froggie
Red raffia
Gold brads
Diamond Glaze
Small piece of Organza
Tim Holtz large Rosette Maker
Springtime Heart Pocket
I wanted to incorporate Graphic 45 into my Valentine theme for classes this year and decided on the beautiful Once Upon a Springtime collection for this project. My Springtime Heart Pocket class will be on February 5 at Stamping Details in Poway, California. The large heart pocket with beaded hanger measures 8 x 10 inches and holds two large tags, a card panel, and a gift card holder. The pocket is large enough to hold small gifts as well and is a really cute way to show off your valentines. What about adding some little soaps and fancy washcloths or a set of handmade stationary with envelopes? Think how cute it would be to make up a bunch of little ones to decorate a Valentine Tree. A heart using the new Little Darlings collection would be so adorable for Mother’s Day. I think this wall pocket will have tons of uses and can also be used for birthdays and anniversaries, thinking of you gifts, and more
Tips and Techniques:
I used my Accucut dies but you could use any other heart shapes, hand cut or die cute. My large heart is about 7 x 9 inches in size. Start by cutting one chip board piece and two paper pieces. Adhere the papers to the front and back. Lay the chipboard piece on a third piece of paper and trace plus 1/8 inch on each side of the bottom of the heart. (You don’t have to add the extra paper to the entire bottom half- just the top inch or so on both sides.) Notice how the sides are just a bit larger than the original heart? This will create a pouch when you glue up the sides.
Scooch the sides in and glue along the edge with a strong white glue, let dry. Spray one pre gathered strip of lace with Jingle Bells and Coffee Shop Tattered Angel Sprays and the other with Patina and Gumdrop, let dry. Punch holes on the heart tops and measure wire about 10- 12 inches long. The length will depend on how long you want your hanger to be. Loop one end of the wire through one of the holes, tighten, and start beading. When you have it as long as you want it, loop the other end through the second hole, tighten, and cut the wire. Adhere the laces, first the blue green and then the rust. I use hot glue for this. Arrange the flowers and twigs at the top and bottom of the piece. Cut a doily in fourths and glue one fourth to the bottom of the heart. Add the smaller heart shapes to the top of the doily and attach the cameo to add that extra bit of sparkle! Voila! All done!
These are very simple. The tags are 6 x 3 inches and are backed by an ivory cardstock. Layer up the teal cardstock and background images. Cut out the little rabbits or chosen fairies and attach to the tags. Add dimension by adding extra strips of chipboard. Punch holes in the tag tops and attach tulle. Add some little flowers in the corners and to the holes if you like to finish off.
For the Card Panel- simply layer up the ivory cardstock, Teal cardstock and one of the postcards from the Woodland Fantasy sheet. Add bling to the top and flowers to the corners. You can use this is a card panel, sign the back and attach to a package or layer it up on a card. To create the large gift card cut an 8 x 6 sheet of cardstock and score at 3 inches, 3 inches, and 2 inches. The 2 inch section will be folded up to create a little pocket to house the gift card. Decorate the inside top with image paper and flowers. Rim the top edge of the pocket with flowers and add German Scrap borders to the bottom. Add your gift card and you’re ready to go!
Supplies:
All papers are from the Graphic 45 from the Once Upon a Springtime collection
Fairy Folk #4500283
Woodland Fantasy #4500285
Once Upon a Springtime #4500281
Medium weight chipboard
Teal and Ivory cardstock from the Coredinations Graphic 45 Signature Series
Accucut Heart Die #2 J and L H1210
Petaloo flowers Mixed Blooms Blue Green ITEM: 1279-190 from the Chantilly collection
Assorted flowers and Christmas twig leftovers (from my stash)
Pearls and round glass marbles
Wire and matching beads of choice
Cameo (Dollar Store)
Hand dyed laces
Peach Tulle
Gold German Scrap Borders (Artchix Studio)
Gold Doily
Tattered Angels Jingle Bells Coffee and Shop for the rust colored lace and Patina and Gumdrop for the blue green lace
Recollections Bling
I love Steampunk so when I decided to celebrate Valentine’s Day with Graphic 45 I certainly couldn’t leave these luscious papers out! I used my Accucut die but you could use any die cut or hand cut hearts. I like the unevenness of the primitive dies for this look. This wall hanging is about 7 x 11 inches not including the beaded hanger. What a great way to spruce up your workspace or forgotten corner in your home. Combine your Steampunk Heart with other Steampunk art to create a focal point on a wall. It would also make a unique door hanger! I’ll be teaching this class in Poway at Stamping Details on February 11 just in time for the big day!
Tips and Techniques:
Cut out the chipboard. Cut one heart out to of the black cardstock, emboss it, and lightly rub over the raised area with a bit of gold leaf pen on your finger. This will be the front. Cut one heart from the Fantasy Floral- this will be the back. Apply papers to the chipboard. Attach some of the large die cut gears to the front to add color. Cut out the Steampunk Debutante girl and adhere to the front. Punch holes all the way around the heart. Lace up the edges with black eyelash yarn. Tie off at the end. Attach a wire through a hole at the top and fasten tightly. Sew through each hole with the wire and add beads, washers, and gears, as you go. Again, fasten tightly at the end. Take another wire about 12 inches long and attach this to one of the top holes. Start beading to form the hanger and attach the end of the wire to a top hole on the other side of the heart. Cut out die cuts of wings from copper and emboss. Decorate the metal flowers with Stream ink and add the button for the center. Attach brads to some of the gears. Adhere the clock faces, wings, charms and dangles to finish off. A Steampunk Valentine for all to enjoy!
Supplies:
Graphic 45 Renaissance girl from the Steampunk Debutante 8 x 8 pack
Graphic 45 Metal Flower Staples 4500300
Graphic 45 Fantasy Floral paper 4500263
Graphic 45 Metal Button Staples 4500302
Medium weight chipboard
Coredinations Graphic 45 black cardstock
Gold metallic pen
Accucut Hearts #7 J and L H1231
Tim Holtz Gadget Gears dies, Wings die, and gears embossing folder
Tim Holtz metal gears and washers, tokens, clock face and game spinner , keys, and word sticks
Tim Holtz Alcohol ink Stream
Copper foil
Assorted washers, gears, charms, and Paris clock (from my stash)
Black Eyelash yarn
Wire, matching beads, and silver screw brads
"Peace" Altered Canvas
Tips and Techniques:
The bottom canvas will remain just a plain canvas and the top will become the TOP layer. Turn one of the canvases over and cut a large X in the middle reaching almost to the wood bars. You’ll be removing some of the fabric and rolling some of it back to create interest. Cut a 4 inch square from the center and set aside. You can now cut a few more slits running up towards the wood frame on all sides. Turn the canvas back over to continue. Using a white glue or Modge Podge roll the fabric forward to create small rolls on the bottom, top, and sides. (Fabric Stiffener will also work well for this.) You can use a pencil to do this and carefully and remove it. You’ll have to finesse it a bit as the glue will make it sticky. With the remaining 4 inch piece, cut or rip it into 4 or 5 strips and create rolls the same way you created the TOP rolls. Set aside. (You may want to cut these up later to make smaller rolls.) Glue the TOP layer to the base canvas and let this dry overnight. When everything is all dry-base paint both canvases, the plain one and the TOP layer. Be sure to go around the edges too as these will show later. Sponge paint everything using the gold, green, and copper paints. Let dry well.
Cut or tear some papers and add them to the frame of the piece. Apply glue or Modge Podge and adhere the images to the center of the piece. Add molding paste to the edges of the cut images s to blend them into the canvas. Add a bit of texture with a credit card or sponge. Let dry. Over paint with gold and copper, green blue paints, sponging as you go. Add extra rolled canvas pieces to the sides, top and bottom, wherever you like. Layer images, drapes, tags, key, etc. and use chipboard to create depth. Attach the PEACE word at the top and add mosses and feathers, key, flowers, leaves, etc. Remember, you’re building up from the bottom of the piece and working outward. Randomly add all the sticks to the entire frame. Arrange the corner pieces and attach the door knob plate. Decorate the flower with Cranberry Alcohol ink and add the button. Attach to the right hand corner of the piece along with flowers, feathers, and leaves. Finish up with tags, the bird nest, and any little extras you might choose to add. So much fun to create and display!
Supplies:
2 12 x 12 Canvases (with frame)
Medium Molding Paste (any kind)
2 sheets of the Graphic 45 Renaissance Faire paper 4500107
Graphic 45 Renaissance Faire Tags 4500117
Graphic 45 Ornate Metal Door Plate and Knob Staples 4500297
Graphic 45 Button Staples 4500302
Graphic 45 Metal Flower Staples 4500300
Black, metallic blue green, and gold paint
Random sticks, twigs, and colored moss, gold and copper leaves
Petaloo flowers Mixed Blooms Blue Green ITEM: 1279-190 from the Chantilly collection
Tiny nest and bird eggs
Light copper dimensional brads and dragonfly brads
Tim Holtz Cranberry Alcohol Ink
feathers and flowers from my stash
Large key ( A Tim Holtz word key would be nice here too)
Peace die cut
Thick chipboard to add dimension to some of the pieces
All That Jazz
I love making mini albums and I really wanted to incorporate the Curtain Call papers into a little calendar mini. This is quite a simple mini for me but you could fancy it up to your heart’s content! I always want my students to think outside the box and kind of “Make do” with what they have on hand if possible. Even though I used the Accuct dies for this book you could use the Tim Holtz Dwelling dies or even cut out shapes free hand. Since they are straight lines they will still be easy to cover. Notice on the cover how I separated the buildings by using different papers. This sets the cover apart from the rest of the book.
Cut out the cityscape and decide if you want it accordion style or in a book binding. Adhere the papers and on the cover, create separate buildings by using different papers for each building. Design several different pocket styles, combing corner pockets and straight pockets throughout the book. Attach German Scrap Borders to some of the pocket tops. Place calendar months on the pockets varying placement. Cut out tags, images, etc. add brads and place in pockets. On some of the buildings, affix square and rectangular gems to simulate windows. On others, cut out small images of people and images. Bind the book using your favorite binding method. I used the Bind it All. Add ribbons to the spine and sayings and images to the tops of several buildings. Attach feathers, tags, and flower and Ooh La La! All done!"
Supplies:
Graphic 45 The Cinema 4500323
Curtain Call Borders 4500327
Curtain Call Tags 4500328
Moulin Rouge 4500325
Curtain Call 8x8 Paper Pad 4500330
Accucut Accucut B1579 City Accordion Book
Recollections flowers-black
Petaloo flower from my stash
Recollections bling for windows and gold brads
black seam binding, gold and silver ribbon
Gold Mini German Scrap Borders from Artchix Studio
Calendar from Jenni Bowlin
That's all for today, G45ers! We want to give a huge thank you to Carol Murphy for her astonishing work today. We highly recommend that you check out her website Altered by Design. You can explore galleries of her work, learn about her classes, link to her youtube page and much more! It's quite an inspiring site and we highly recommend it! We hope you'll come back and see us tomorrow as we bring you fun and excitement from our adventures at CHA. It's going to be a great day and we can't wait to share it with you! We will also be announcing the 3 winners from our January Hero Challenge! It's going to be a lot of fun! Have a wonderful Thursday and thank you all again for stopping by!"
Happy Papercrafting!
Your Friends at Graphic 45
Okay, I'm absolutely on adrenalin over-load when I think of all the cool artistry that can be created when we join forces at Art 'n Soul. What about you?
I have to leave you with this photo. I was window shopping in old downtown Palm Springs and there was the best pet store (of course!). Behind the counter were the cutest sisters . . . you'd never know they were there unless you peeked behind the counter.
 |
| The girls never moved a muscle when I poked my head behind the counter and took their picture . . . I think they like going to the store with dad! |
I began beading when I was about 8. I was illustrating since I could choose up a pad and my experience the disciplines always provided an chance to try whatever was placed before side of me.
ReplyDeletescrapbook paper