Webster's Pages Spring Market papers are in the store and on the back left rack on the left side. In addition, the chipboard buttons are on the rack as well. Additional items from this collection will be shipped this week. I'm anxious for the second part of the shipment to arrive because it will include the new cling stamps to go with the paper collection, and I want to see what they're all about!
 |  |
 |  |
 |  |
On the backside of the Garden Seed paper, there are little owls sitting in the trees!
 |
| The "lines" at the bottom are strings of twine to adhere your chipboard buttons with. |
Yesterday's demo of Pan Pastels by Marj was a huge success! So many of us discovered how easily they are to work with and the beautiful results that are revealed rather quickly. We even tried them out on resist paper . . . so now the challenge is to find more resist papers! Many new orders were placed for the Pan Pastels. With so many of the Pan Pastels coming into play, we now think we need you to know about some of the accessories you're going to want at some future time, sooner than you might think! Here is some information from 2 websites:
NEW! Palette Tray with Cover
|  |
 Ref: 35010 Holds 10 Colors 8 x 11.25" (20 x 28.5cm) |

(Palettes are sold empty. They do not include colors shown in pictures.)
Lids & Storage Jars
Additional PanPastel lids & storage jars can be purchased separately from your PanPastel retailer.
32010 - 3 empty storage jars & 1 lid
32012 - 8 lids
Sofft ToolsA selection of Sofft Tools is available for use with PanPastel Colors SofftArt.com |  |
Sofft® Tools
 Draw, paint and blend like never before
The Sofft range is a new generation of tools and applicators for artists and crafters, created by artists for artists.
Sofft Tools were specifically developed for use with PanPastels™, and can also be used with most water-based art and craft materials to create a variety of exciting new techniques, marks and effects. Finished effects are different to brushes as the brush stroke is eliminated.
Each product in the Sofft range was developed in our laboratory, and extensively tested and re-tested in our art studio; resulting in a selection of unique professional artists’ quality tools.
Sofft products are versatile, inexpensive and can be re-used several times.
Versatile
 Use Sofft Tools with a variety of painting and drawing mediums:
 • PanPastel Colors
• Soft Pastel Sticks
• Charcoal
• Watercolors
• Acrylics
• Inks
• Waterbased Craft Paints
• Ceramics
Micropore Sponge
Reusable
The semi-absorbent material used in Sofft Art Sponges and Covers is specially formulated for art and craft applications, to hold and release the right amount of material. It is non-abrasive for smooth, uniform results.
Sofft Sponges and Covers can be re-used several times (the number of times depends on the type of color and surface being used).
Unique Shapes & Sizes
The shape of each Sofft Tool has been designed specifically for the needs of artists and crafters.
Easy to Clean
Simply wash with soap and warm water, squeeze and air dry.
More Control
Sofft Tools enable a more direct connection with the working surface, making it easier to control and predict the final marks achieved.
Easy to Use
Sofft Tools instantly feel intuitive and comfortable to use and are even easier to use than a brush!
A number of different effects can be achieved with each tool, for example, by using the sides and edges of the tools. Refer to the charts on the
Sofft® Knives & Covers
 Sofft Covers
 These innovative Covers are sized specifically for use with Sofft Knives and Shapers. They transform Knives and Shapers into absorbent tools, capable of carrying and releasing color and material in a unique way. Sofft Covers are made from our specially formulated micropore sponge which is semi-absorbent.
Sofft Knives
When used with Sofft Covers, the traditional painting knife is transformed into a multi-use and absorbent applicator for art and craft techniques. These inexpensive tools function like a cross between a brush and a knife.
Each knife has been ergonomically designed to fit in the hand for ease of use and for good control. Sofft Knives are made from a flexible, and durable plastic material. The handles are shaped like wooden handle knives for maximum comfort. Sofft Knives can also be used without Sofft Covers as traditional painting knives.Sofft Shapers
These indispensable art and craft tools can be used for a variety of applications either with or without Sofft Covers. The flexible silicone tips, when used in conjunction with Sofft Covers, make Shapers a versatile and absorbent tool.
 |  |
| Simply match the reference number of the Cover to the Knife or Shaper e.g use Cover No.1 with Knife No.1 | Gently pull Sofft Cover completely over Knife or Shaper tip (like a sock). Covers can be re-used several times. |
Note: Excessive stretching will tear the sponge.

|


The store is planning to send in the order this week. If you're interested in any of these accessory items, please let the store staff know asap.
Art 'n Soul Journal Club member, Karen Block, was slow to let us discover what she's been doing in her journal. She said most everything in her journal is a "work in progress." Aren't they all? Her works are very creative, even though she thinks she might be shortcutting too much in a couple of instances by using printed paper designs rather than drawing them up herself! (Silly girl!)
I think you'll enjoy looking through some of Karen's journal as much as I did!
 |
| Why aren't we surprised that an elephant graces the cover of Karen's journal. |
 |
| These colors bring this page to life beautifully! |
 |
| another piece of a 'work in progress' |
 |
| These dancing ladies appeared as if they were cut out and applied to the background paper. |
 |
| Karen 'apologized' that this was printed paper. However! Karen is the one who brought the birds to life with her coloring magic. |
 |
| another "work in progress" . . . I could be happy with it as a finished work of art suitable for framing! I love the way she is expressing thoughts about someone's astrological sign. |
 |
| what more? I think she wanted to figure out a suitable background! |
 |
these are her 'ladies of the night' . . . waiting for a design to join them together and possibly a different background design? don't you love these stamped images of women? I have the stamp sheet of them and Karen's work here has inspired me to dig them out and do something soon! |

 |
| AND THIS IS THE PIECE de RESISTANCE . . . Karen's original free-hand drawing! WOW! |
Art 'n Soul is so fortunate to count so many talented, creative and inspiring women as friends and customers. They're doing exactly what the store is set up to do . . . inspire creativity and artistic endeavors.

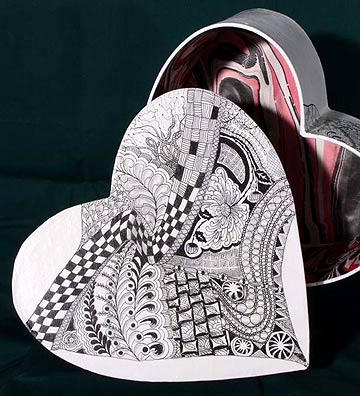
Here's a delightful heart box decorated with Zentangle art and lined with hand-made paper that one of our CZTs, Mickey Weitsen, created for an upcoming benefit for St. Tammany Art Association and New Orleans Museum of Art.


The cutting sandwich for the Grand Calibur is: A-Base Plate, die template with the cut side facing up, paper, then the C-Cutting plate. See how I placed the fold of the cardstock just inside the cutting line? That will make the shaped card base.


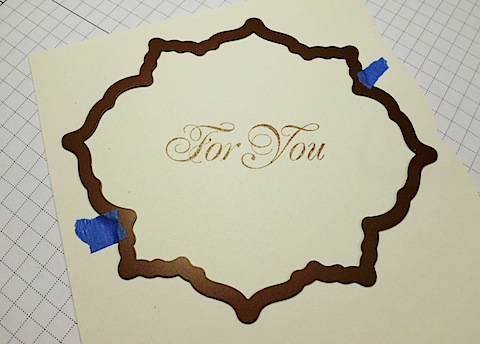
Next you're going to do the exact same step again . . . use the LF-168 Grand Large Labels #6 to cut then emboss a piece of patterned paper. Before adhering to your card base, using "Creamy Brown" ColorBox Fluid Chalk Ink (by Clearsnap), ink around the entire label. From a coordinating piece of patterned paper, cut a 5 x 2" strip. Centering this strip on top of the LF-168 Grand Large Labels die template you just cut, attached with a zig zag machine stitch. Adhere to your card base.

Next, take black cardstock and your S5-031 Fancy Tags Three die template and cut with your Grand Calibur. To emboss, keep the die template cut side facing up, on the A-Base Plate with the paper inside of it. Place the Tan Embossing Mat on top of the die template and paper, then cover with the B-Embossing Plate. Feed the sandwich through the Grand Calibur. Center and adhere to the front of your card.


Using S4-116 Classic Circles SM #3, cut then emboss a circle from the Cosmo Cricket "Elements" sheet.

Use SCRAPBOOK ADHESIVES BY 3L 3-D Foam Squares to pop up the circle on the Fancy Tag.
Embellish with Kaisercraft (black) pearls and a button. Adhere sticker sentiment to you card.

Supply List: Spellbinders Grand Calibur, LF-168 Grand Large Labels, S5-301 Fancy Tags Three, S4-116 Standard Circles SM; Worldwin, Cardstock; Cosmo Cricket, circa 1934 patterned papers; Kaisercraft, Black Pearls; Clearsnap, ColorBox Creamy Brown Fluid Chalk Ink; SCRAPBOOK ADHESIVES BY 3L, Mounting Squares, 3-D Foam Squares; Glue Dots; SRM Stickers, Sticker Sentiment; Craft Supply, Button; Towbow, Mono Multi Liquid Glue.
Here's another project I created using the same die templates . . . an altered floating frame. This time using the LF-168 Grand Large Labels die template to cut and double mat my photo. I wanted to keep the focus on the picture, but I also wanted to use the color "Grey" (the color for Brain Cancer). Using Flourishes "Think Pink - Fight like a Girl" (Set #63), the HOPE stamp was PREFECT for my title. I stamped it on the lightest shade of grey cardstock and using 3-D Foam adhesive popped it up onto one of the S5-031 Fancy Tags. My Dad has been fighting brain cancer for the last 10-months, this picture was taken during his first gammaknife procedure. My Dad has ALWAYS been the rock of our family . . . he's ALWAYS taken care of us, been there for us and now we're his ROCK, we'll take care of him and will ALWAYS be there by his side through this journey.

These are the die templates I revealed today . . .
 SKU/Product Name: S5-031 Fancy Tags ThreeMSRP: $19.99
Measurements:
1: Oval: 2 x 3⅜″
2: Circular: 2 x 3¾″;
3: Rectangular: 1⅞ x 3⅛″
SKU/Product Name: LF-168 Grand Large LabelsMSRP: $49.99
Dimensions:
1. 3⅜ x 4⅜″
2: 3⅞ x 5″
3: 4⅜ x 5 ⅞″
4: 4⅞ x 6¼″
5: 5⅜ x 7″


From the September 2009 Zentangle on-line Newsletter:
Zentangle Hearts . . . (for Valentine's Day)
Or, how these two people "heart" Zentangle.
V took a page from Wizard of Oz and her Zentangles frame a poem she found within that page. She writes,
"I've been having so much fun with Zentangles and wanted to share one that is a blend of a Zentangle design and words from a book page. A friend sent me the book Humument, where the artist Tom Phillips plays with art and words, creating something that is beyond both. So I gave it a try. Thought you might like to see it.
"Thank you so much for your generosity in making a how-to of your newsletters. I also bought the kit and have practiced different patterns in a spiral-bound artist's sketchbook. The paper isn't as fine as that in the kit, but I can work larger if I want to. I'm not an artist; I am a writer. But when I showed some of my designs to an artist friend, she insisted that I am an artist.
"In gratitude, V"
Here's a delightful heart box decorated with Zentangle art and lined with hand-made paper that one of our CZTs, Mickey Weitsen, created for an upcoming benefit for St. Tammany Art Association and New Orleans Museum of Art.
Spellbinders' last two day worth of sneak peeks are here. We are so excited at the store because we know how excited you're going to be at the prospect of getting your hands on some or all of these new dies. Susie and Debbie are writing up their pink sheets right now! The store is printing out copies of all of the new designs to make it easier for you to pick out the ones you like.
This is the Spellbinders product I introduced:
Blossom Four
SKU# S4-313
MSRP $24.99
Measurements:
1: ¾ x ⅝″
2: 1¼ x 1½″
3: 2 x 2¼″
4: 2⅝ x 3″
5: 3¼ x 3⅞″
6: 4⅛ x 4¾″
and
Nested Leaves
SKU# S4-321
MSRP $19.99
Measurements:
Smallest Leaf:
1: ½ x ⅝"
2: 1⅛ x 1⅜"
Medium Leaf:
3: ⅝ x 1⅜"
4: 1¼ x 2½"
Largest Leaf:
5: ⅞ x 1"
6: 1½ x 1⅞"
7: 2¼ x 2¾"
8: 3 x 3⅝"
From Gina Hanson's blog, There Goes My Life:
I’m thrilled to share LF-168 Grand Large Labels and S5-031 Fancy Tags Three with you . . .
Cut and score a 12 x 5 1/4" piece of cardinal red Worldwin cardstock. Place the LF-168 Grand Large Labels #7 (#1 is the smallest) die template and cardstock on your Grand Calibur base plate like shown, making sure scored cardstock is below cutting line on die template.

Cut and score a 12 x 5 1/4" piece of cardinal red Worldwin cardstock. Place the LF-168 Grand Large Labels #7 (#1 is the smallest) die template and cardstock on your Grand Calibur base plate like shown, making sure scored cardstock is below cutting line on die template.

The cutting sandwich for the Grand Calibur is: A-Base Plate, die template with the cut side facing up, paper, then the C-Cutting plate. See how I placed the fold of the cardstock just inside the cutting line? That will make the shaped card base.


Next you're going to do the exact same step again . . . use the LF-168 Grand Large Labels #6 to cut then emboss a piece of patterned paper. Before adhering to your card base, using "Creamy Brown" ColorBox Fluid Chalk Ink (by Clearsnap), ink around the entire label. From a coordinating piece of patterned paper, cut a 5 x 2" strip. Centering this strip on top of the LF-168 Grand Large Labels die template you just cut, attached with a zig zag machine stitch. Adhere to your card base.

Next, take black cardstock and your S5-031 Fancy Tags Three die template and cut with your Grand Calibur. To emboss, keep the die template cut side facing up, on the A-Base Plate with the paper inside of it. Place the Tan Embossing Mat on top of the die template and paper, then cover with the B-Embossing Plate. Feed the sandwich through the Grand Calibur. Center and adhere to the front of your card.


Using S4-116 Classic Circles SM #3, cut then emboss a circle from the Cosmo Cricket "Elements" sheet.

Use SCRAPBOOK ADHESIVES BY 3L 3-D Foam Squares to pop up the circle on the Fancy Tag.

Embellish with Kaisercraft (black) pearls and a button. Adhere sticker sentiment to you card.

Supply List: Spellbinders Grand Calibur, LF-168 Grand Large Labels, S5-301 Fancy Tags Three, S4-116 Standard Circles SM; Worldwin, Cardstock; Cosmo Cricket, circa 1934 patterned papers; Kaisercraft, Black Pearls; Clearsnap, ColorBox Creamy Brown Fluid Chalk Ink; SCRAPBOOK ADHESIVES BY 3L, Mounting Squares, 3-D Foam Squares; Glue Dots; SRM Stickers, Sticker Sentiment; Craft Supply, Button; Towbow, Mono Multi Liquid Glue.
Here's another project I created using the same die templates . . . an altered floating frame. This time using the LF-168 Grand Large Labels die template to cut and double mat my photo. I wanted to keep the focus on the picture, but I also wanted to use the color "Grey" (the color for Brain Cancer). Using Flourishes "Think Pink - Fight like a Girl" (Set #63), the HOPE stamp was PREFECT for my title. I stamped it on the lightest shade of grey cardstock and using 3-D Foam adhesive popped it up onto one of the S5-031 Fancy Tags. My Dad has been fighting brain cancer for the last 10-months, this picture was taken during his first gammaknife procedure. My Dad has ALWAYS been the rock of our family . . . he's ALWAYS taken care of us, been there for us and now we're his ROCK, we'll take care of him and will ALWAYS be there by his side through this journey.


These are the die templates I revealed today . . .
SKU/Product Name: S5-031 Fancy Tags ThreeMSRP: $19.99Measurements:
1: Oval: 2 x 3⅜″
2: Circular: 2 x 3¾″;
3: Rectangular: 1⅞ x 3⅛″
Dimensions:
1. 3⅜ x 4⅜″
2: 3⅞ x 5″
3: 4⅜ x 5 ⅞″
4: 4⅞ x 6¼″
5: 5⅜ x 7″
From Linda Duke's blog, Linda's Works of Heart:
I’m thrilled to share S4-313 Blossom Four and S4-321 Nested Leaves with you. I was extremely excited when I learned I was revealing these die templates… As you all should know; I love ALL things flowers for sure. When you look at this card you obviously see how I used this die template around the sentiment, but I also used it to make the flower… ;) yep, a twofer LOL!! I also used the S4-321 Nested Leaves #2 and #3 (#1 is the smallest) and added 2 leaves around the flower. Anyway, I had a ball working with these new flowers and leaves.
Here’s a little tutorial showing you how I made the center portion of this card.
On Vanilla cardstock, I positioned S4-313 Blossom Four #4 and 6 so they were nested to make a frame, and I would have the proper placement for my stamped sentiment.
While the dies are on the cardstock, I went ahead and stamped my image.
After I stamped the image I removed both dies, and turned the larger die over so the cutting side was facing the cardstock, and taped in place. Cut as shown.
You will have this when done. NOTE: I did not emboss my project yet I just cut.
On a separate piece of Vanilla cardstock, position both dies with the cutting side facing the cardstock, and tape in place.
You should have this, but don’t remove your paper from the dies just yet.
NOTE: I still have not embossed my paper.
Now, place the I2-1006 Floral and Stone Impressabilities under the two dies as shown. Run this through the Grand Calibur™ with this sandwich: Base Plate, Impressabilities, Die templates & paper (with cutting edge facing up), Tan Embossing Pad, Embossing Plate.
This is what you should have.
See how the die template left a border around the flower shape, and the centers embossed beautifully!
With a sponge and ink of your choice, sponge lightly.
It should look something like this.
Place the foam pads on the under side of the cardstock.
Place on top of the very first die with the sentiment.
Cut/emboss the S4-321 Nested Leaves #2 and #3 and sponge around the edges.
Shape each leaf, and place under the S4-313 Blossom Four finished flower.
I thought I would share this picture showing you a completely different way to use the S4-313 Blossom Four die template.
Note to add:
There are 6 die templates in S4-313 Blossom Four, which come to about $4.00 per die template. There are 8 in S4-321 Nested Leaves, which makes them about $2.50 per die template. That’s a great value for triple function (cut, emboss and stencil) die templates!!
Supplies:
Spellbinders: S4-313 Blossom Four #4 and #6, S4-321 Nested Leaves, I2-1006 Floral and Stone Impressabilities, S7-018 Big Scalloped Border Grand, Grand Calibur™ GC-001.
Stamps: Victorian Nested Frames by JustRite – Stamp Simply Ribbon Store.
Stamp Pads: Latte, Shell Pink Ranger Adirondack Dye Pads – eclectic Paperie.
Ribbon: May Arts Satin, Crochet Lace – Stamp Simply Ribbon Store.
Cardstock: Life’s Journey 12x12 Paper Pad by K & Company. Very Vanilla – Stampin’ Up!
Misc: 2-Way Glue, stampin’ dimensionals – Stampin’ Up! Maya Road Vintage Pearls Trinket Pins – eclectic Paperie. Kaiser Self Adhesive Pearls – Stamp Simply Ribbon Store. Buttons PaperTrey Ink, Sponge – Michaels.
For my second project:
I love to make altered projects, and this little box was perfect for this flower and leaves. Start by covering the entire box with Flower cardstock, and sponge all edges. Apply glue around the box top edge, and add the string of pearls, let dry. Very lightly add glue to crochet lace and attach to the sides of the box top.
Cut/emboss the leaves and flower using S4-313 Blossom Four and S4-321 Nested Leaves die templates, then use a Copic Marker and air-brush the centers of each flower layer (both sides). I then shaped each flower petal, and used pop dots to attach each layer. Cut/emboss number 2, 3 & 4 die templates of the S4-321 Nested Leaves, and lightly sponge around the edges, and shape then attach the flower and leaves to the box lid with glue.
NOTE: Before glue dries thread the string through the key and slide between the flower and box lid so it will be in the glue used to attach the flower to the box top. Add ribbon, pearls to flower center, and lock on box front.
Supplies:
Spellbinders: S4-313 Blossom Four, S4-321 Nested Leaves, Grand Calibur™ GC-001.
Copic Marker: RV42 Salmon Pink – eclectic Paperie.
Ribbon: May Arts Satin, Crochet Lace and String Pearls, Self Adhesive Pearls – Stamp Simply Ribbon Store.
Stamp Pad: Latte Ranger Adirondack Dye Pad – eclectic Paperie.
Cardstock: Blue Hill Collection Flower and Rain – Crate Paper.
Misc.: Lock and Key by Melissa Frances – eclectic Paperie. Thread, Zip Dry Paper Glue, Paper Mache Box – Michaels
No comments:
Post a Comment